The reasons for my choices
Here is a description of the project from the very beginning with:
– the reasons for my choice for this type of unique solution.
– the different steps necessary for the construction of this "solar" bike
After being able to finish my first Sun Trip in 2017, it was important for me to enjoy and capitalize on all the key learnings I gained during this hard adventure. I really needed to fundamentally improve my solar bike based on all the problems I encountered during the Sun Trip tour in 2017: this was the "MAIN DRIVER" for my new project.
After extensive studies, I had the idea to build a brand new solar vehicle based on a tilting trike.
I have been studying for several months this new architecture, decidedly very interesting and promising several advantages / key features:
- Improved stability
- this was the biggest problem I had with my 2-wheeled recumbent solar bike, so it's definitely the FIRST in terms of priorities:
- I always had to slow down considerably in the steep slopes of the Alps,
- the difficulty of managing the sharp turns I encountered on the alpine roads,
- the narrow streets I had to walk through in all the cities I passed through,
- a very limited turning radius.
- this was the biggest problem I had with my 2-wheeled recumbent solar bike, so it's definitely the FIRST in terms of priorities:
- Increased security, also a priority, at several levels:
- static: from a simple "quick stop" on the road to a generic "parking" point of view,
- dynamics: confidence in the extra grip of the third wheel, especially in case of bad roads, rain, rapid descent,
- Visibility: Conventional tricycles are very low, due to the need to minimize "tipping" when turning.
- Simplicity and minimal weight increase
- No need for an "ad hoc" locking mechanism, fewer moving parts than possible.
- Ease of use
- should be like driving a 2 wheels lying down.
- Effective
- This is the basis of a solar bike, and this is still true for a tilting trike, every waste of energy must be avoided.
- Manipulation
- The real wheels can be quite close, no bigger than my shoulders.
- Comfort
- compared to a classic 3-wheel trike, the big advantage of "tilting" is to virtually eliminate lateral forces on the rear wheels and allow the use of 700C wheels without problem,
- Finally, it should always be possible, without affecting the above requirements, to install:
- a front wheel with Direct Drive hub motor (instead of a reduced motor),
- a 48V battery (instead of 36V),
- a larger solar panel of 200Wp (instead of 150Wc).
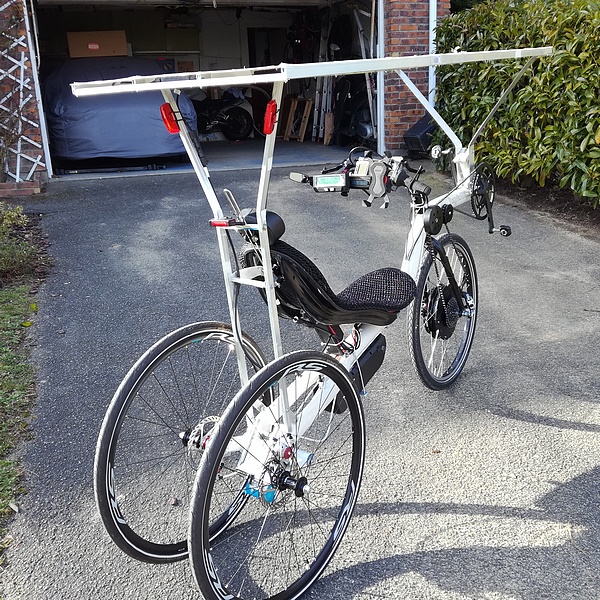
The basis of this new project was a recumbent bike of type 'FWD' = Forward Wheel Drive.
The reason for my choice is that I could develop a tilt mechanism on the rear wheels (non-drive) only for this type of bike. There are very few FWD bikes on the market that we can buy: my choice fell on a used Raptobike.
Technical description
Cycling
This new tilting trike was based on my initial idea of a very simple "tilting" mechanism to add as an "option" to the standard Raptobike frame.
A big technical challenge is the need to "lock" the tilt mechanism so that the tricycle can stand in an upright position.
The solution was implemented with the addition of 2 disc brakes with a single brake lever.
This way, when you pull the rear brake lever, the tricycle stands on its own.
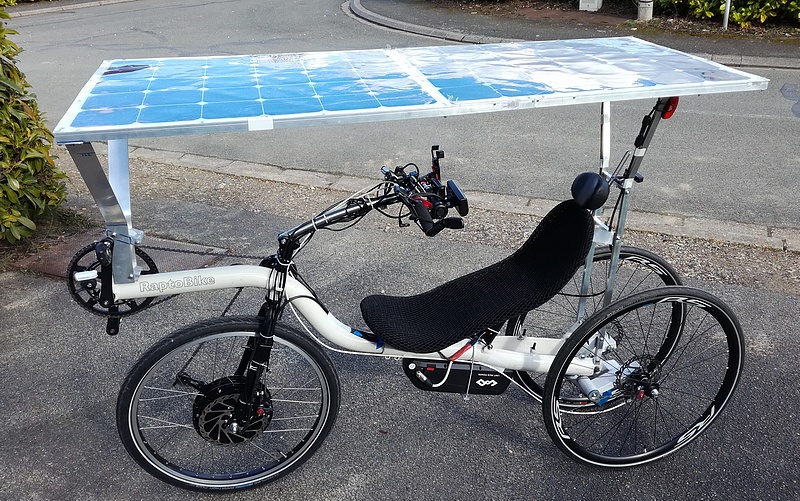
Once this has been successfully tested, it's time to add the various components: hub motor, battery and solar panel connections and panels.
Here's the process I used:
1. Add a power supply to the front
wheel 2. Add battery
3. Build a structure for solar
panels 4. Install solar
panels 5. Connect solar panels to the battery
Motorization
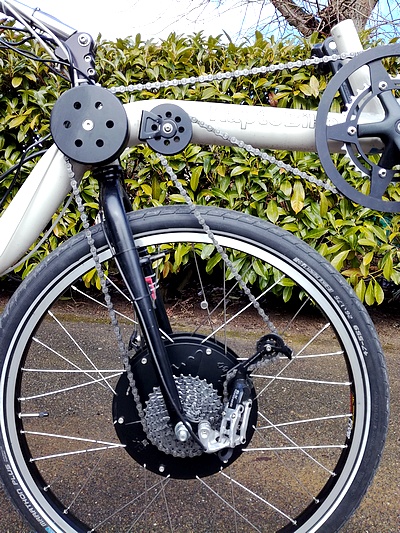
Add a power unit to the front wheel
Following my Sun Trip experiences, my choice for the new engine fell on a DIRECT DRIVE unit.
The final choice for the brand was a FALCO direct drive motor, mainly for the following reasons:
- technological superiority over other similar units,
- Very low "cogging": very important for me, because I like to use the power of the pedal as much as I can,
- ease of use of regenerative braking: either by simply backpedaling or by pressing the "minus" button,
- 5 levels of assistance and 5 levels of regeneration power,
- 5 years warranty,
- 11-speed cassette
Here's the end result: installing the hub motor was pretty simple.
I just had to remove 1mm of the brake caliper bracket because the disc was almost rubbing on it.
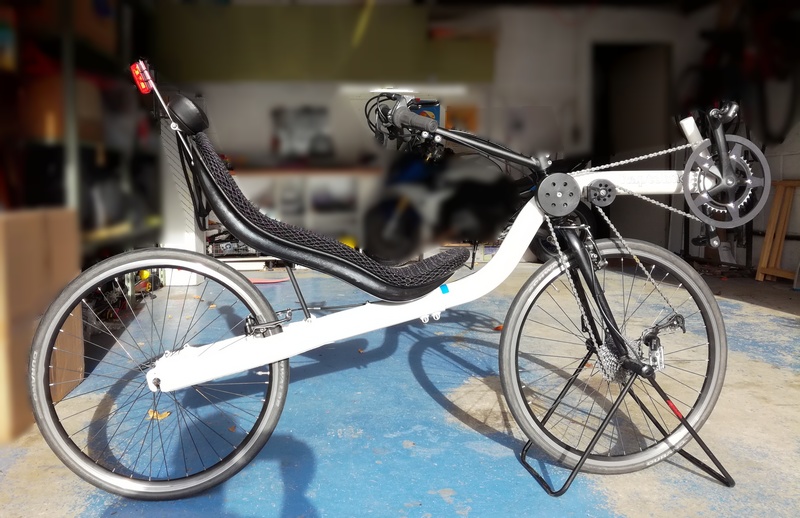
The battery
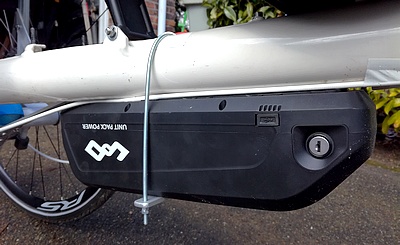
The battery is Lithium, 48V and 16Ah: total capacity of about 800Wh. The position to be installed on the bike is under the frame in a very low place and does not take up space for other accessories. Given the weight and size, it is very important to add extra safety in order to attach it very securely to the frame of the bike.
The structure for solar panels
In parallel with the above activity, I started designing/building the support structure for the 2 solar panels (100 w each).
I decided to install 200 w in the new project, with a special layout:
• width 5 cells (650 mm), normally 4 or 6 cells. I chose a shape for my new panels of 5 cells instead of 6 to reduce the width.
• Length 6 cells (for 2), 810mm
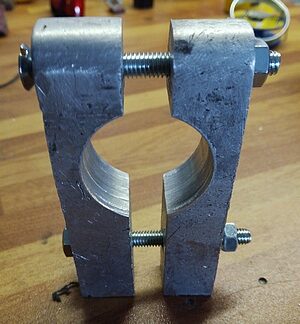
For the front support of the panels, I decided to use the beam that is normally used for the front derailleur (I do not have a front derailleur installed).
I built two aluminum brackets to use as "clamps" to tighten on the front derailleur bracket. This is how the collars were made (from a 25mm aluminum plate) and installed on the front derailleur bracket.
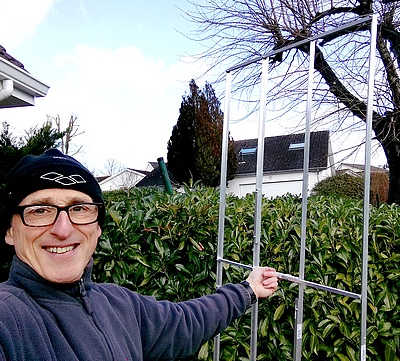
In the meantime, I was able to build the frame to mount the solar panels. It is made of aluminum, very light and rigid: I used 4 mm bolts to connect the different parts. It is a very time-consuming work (and patience…), but the quality of this activity stems from the lifespan and reliability of the solar panels. In this photo, I can easily hold the frame with one finger!
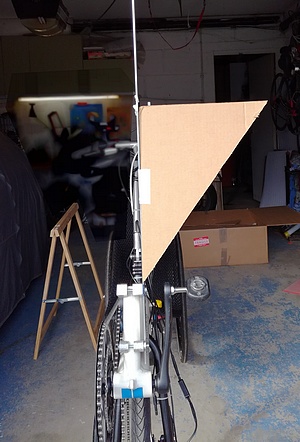
At this point, I started installing one of the flat aluminum brackets: the challenge here was to find the EXACT angle to bend the bracket to achieve the desired height.
Here's how I did it: I cut a cardboard triangle and used it to fold the support with the exact angle required.
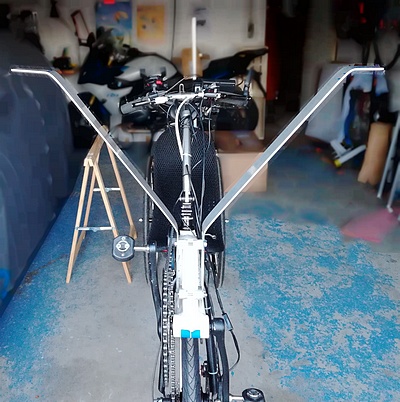
Here is the final result with the two aluminum "flat wings" that support the frame of the solar panels at the front of the trike.
In parallel, I designed the support on the back of the bike.
It took some "trial and error" and also the support of my wife to check that the position was correct and that there was no interference with my helmet.
After checking above, it was clear that there was contact between the helmet and the support structure behind my head.
Here we can see that both supports touch the helmet: for this test, I chose the POC helmet whose aerodynamic shape is more obvious than my other "non-aero".
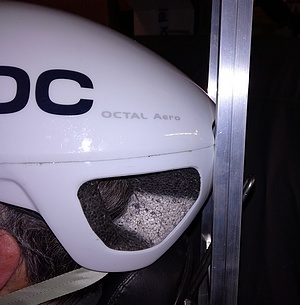
There was no possibility to move the brackets back, as they are fixed exactly where normally the rear brake calipers are positioned.
The only practical way was therefore to bend the supports slightly by giving them a "V" shape to avoid direct contact.
At this point, the bike is ready to be tested, and we can never minimize the importance of spending a lot of time performing this phase.
The minimum is 1000 km to be able to undertake a difficult adventure like the Sun Trip!
Feedback
After building my first 2018 Solar Tilting Trike STT and the following 2019 STT2 (based on a different recumbent frame from the M5), I was able to travel over 6,000 km with both. After all these experiences, I found 5 areas where I could improve my bikes a lot:
- Tilt mechanism: some reliability problems, it became noisy and the handling deteriorated permanently. So I had to understand what caused this problem.
- Comfort: Driving often on very poor quality roads without any "rear damping system" was physically difficult for my back.
- Stability: The center of gravity was a little too high, especially after installing 2 solar panels for 300watts (about 10kg including also the aluminum structure).
- Efficiency of solar panels: with a "small" 200 w solar panel installed on a fixed support, I often had a lot of difficulty achieving acceptable autonomy.
- Engine overheating: with a 26" front wheel and a Direct Drive hub motor, and also with a 28" front wheel (2019 STT2) with an eZee gear hub motor I often felt engine overheating when climbing steep hills for a long time.
My last Tilting Trikes solved all these problems as follows:
- The tilt mechanism is built with 2 connecting rods pulled by the two rear arms: it is more robust and reliable.
- I also added rear suspension, adding a simple elastomer to achieve much higher comfort.
- The stability and maneuverability are now much better since I use "low racer" recumbent bike frames, so I can sit lower.
- I use 300 Wp solar panels with tilting support frame: in this way, energy production has increased considerably, especially early morning and late afternoon.
- After several experiments, I am now very happy to use on my bikes a 20-inch front wheel with a Direct Drive RH212 hub motor: with this solution, I have never encountered overheating again.
This shows that using all our experience, we can always find better solutions and we can continue to work on our solar bikes to improve it continuously!