The trailer
An Aevon STD 100, in aluminium, it is light (7kg) and offers a loading capacity of up to 145 litres. The attachment is on the seatpost, I can turn around without setting foot on the ground.
The first adaptation concerns the swingarm which originally accommodated a 16-inch wheel. As my specifications require me to have three 26-inch wheels, I lengthen the aluminum fork legs by a few cm.
Trailer modifications
Construction of the panel support frames
Initially I imagined and drew under CAD software.
First, I design 3 carbon tube frames. Each panel is therefore attached to its own frame. Each frame being assembled to its neighbour. The advantage is that during disassembly, the size of the panels is considerably reduced and, a tip (one more, gift!), the dimensions of the frame are slightly larger than the panel. What, in the event of shocks, frictions or falls (tested for you, with the stop and twice, the contributor not reluctant vis-a-vis the effort!) avoids damaging the panels this with the risk of amputate the production of precious watts.

I got some square section carbon tubes 20x20mm ext & 16x16mm int. The sections are therefore cut to a length greater than the dimensions of the panel, i.e. 930mm & 670mm and at 45°. For assembly, I insert and glue with two-component epoxy in a syringe the brackets printed in PLA on my 3D printer. Each panel is then riveted and glued with a black silicone gasket to the frame.

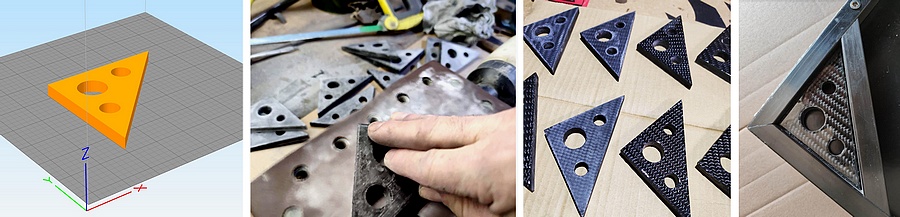
To reinforce the frames, each angle is completed with a piece printed in PLA, covered with carbon + resin fabrics (I offer a tutorial describing the corresponding technique in the appendix) and a piece of tube, all glued to the ‘epoxy.
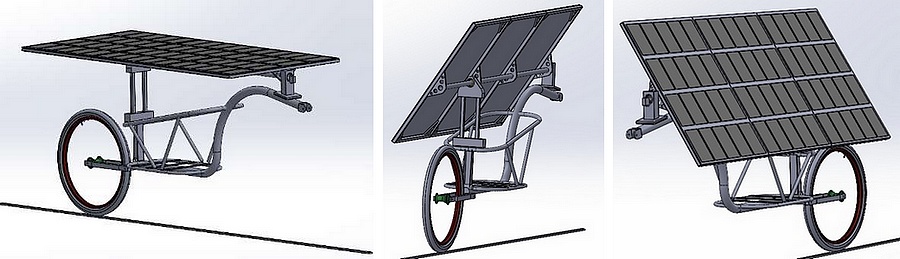
The three assembled panels have a total dimension of 930 mm in width and 2010 mm in length. I therefore reject the idea of pivoting panels on an axis but I keep the axis and the supports.
As an axle, I use a carbon tube of 28mm ext x 25mm int x 3000mm length. Its solidity after use is very satisfactory. To assemble the panels and the tube, I create 4 supports always on the same principle:
- design on CAD software.
- preparation for printing on the printing software.
- printed in two parts for once, the dimensions exceed those of my printing plate, it’s not very serious, I glue the parts and I cover with carbon fabrics.

I’m going to try my hardest to get this assembly to be attached to my trailer, I have to admit. I imagine and I first build this: That is to say, three supports (1) in which the carbon tube passes. These supports are connected with tubes (2) of square section (the same as for the structure of the panels) to two other parts (3) which are fixed on two aluminum plates. One plate fixed on the drawbar of the trailer, the other at the back of the basket.

Fork elongation
- Step 1, I remove the 16” wheel and the accessories to cut the two fork legs with the grinder
- Step 2, I insert the cut fork legs into the extension, an aluminum tube with a square section of 40mm x 40mm, 40cm long.
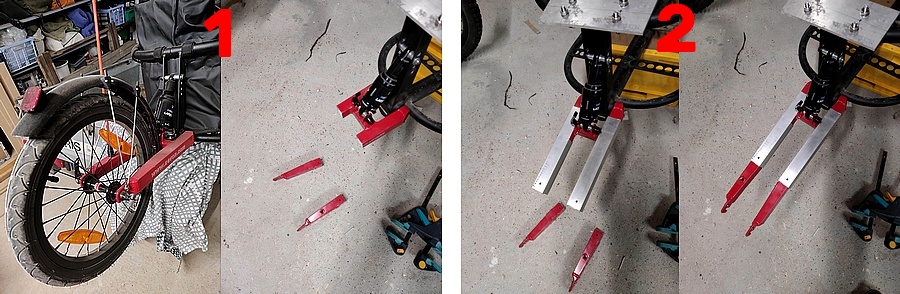
- Step 3, I position the wheel, center it. I drill and rivet the extensions.
- Step 4, I strip and 😉 weld. Aluminum welding is an art, you just have to find the artist!
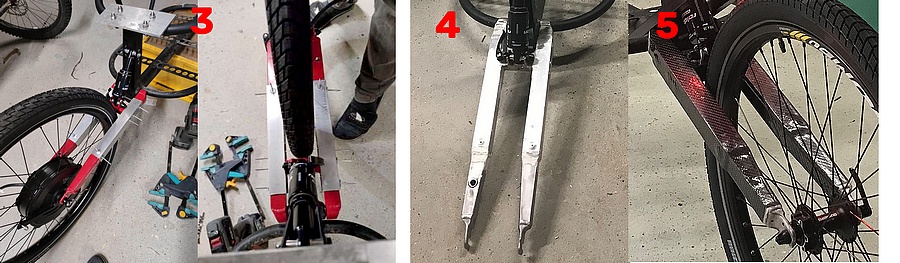
The wheel
26” Mavic 729 rim and 36 spokes; Sapim e-strong spokes; Schwalbe Rigid Pick-Up Super Defense Fair Rubber 26″ 2.35 tire, special for e-cargo bike Michelin MTB C4 AIRCOMP Latex 26×1.9/2.20 inner tube Presta valve, apparently the 2.20 max is also suitable for 2.35 tires … the mysteries of the inner tube!
Review
I think to myself: “Perfect, I can do my first tests…” As a test, I pushed my hitch to the gate and I… turned around. Conclusion, obvious to some readers who will have the delicacy to avoid messages like “I knew it!”, the 26-inch wheel plus the structure above the trailer causes the center of gravity to be too high. Keeping the assembly balanced was becoming too difficult or even dangerous, so I decided to… lower the center of gravity! and there I hear the “it’s obvious”. In these cases, you have to take a step back to avoid the blues sprinkled with despair. Isn’t doing and redoing where you gain a bit of experience? I gained A LOT of experience on this project! Enjoy it. That’s fine, we can continue. I still stay on my 26 inch wheel for the moment, besides the advantage of having three identical wheels, my panels are more horizontal than with a 20 inch wheel. It must affect solar production and there will still be time to switch to 20 inches if necessary.
So I’m back to working on the structure to lower it as much as possible. I recreate the rooms and I manage to lower the panels by more than 10 cm.
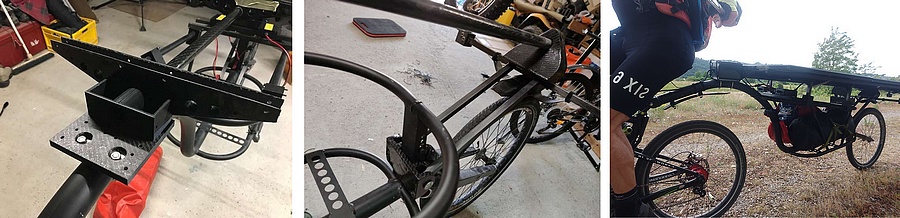
Here, opposite, the trailer in real situation, the center of gravity is, for my part, still high. The assembly behaves completely differently from a conventional bicycle. The rise in dancer is impossible and as soon as you let go of a hand the handlebars become more and more violent at the risk of falling (probably, I did not try on this one). I decide to leave like this.
Author: Richard Lebrun
(email: riclebrun@gmail.com)