Introduction
First of all, I want to point out that almost all my solar bike allows me is to go faster. In other words, to “save time”. In absolute terms, I could make the same trips, with the same loads, without assistance and without technology, but at a lower speed. Then, I am aware that the realization of such a machine is extremely facilitated because I have many privileges, among the most obvious that of being an able-bodied white man and not from a disadvantaged social class.
For me the solar bike is not in itself “sober”, “green”, “ethical”, “unifying”, “THE vehicle of the future” or what not… It is an alternative to dominant practices and imaginaries that I want to oppose. It is a tool that seemed relevant to me at this time in my life and that brings me joy. But I want to keep questioning him.
My specifications
If I had to summarize what guides the realization of my bike (I speak in the present tense because I always consider it in the state of prototype destined to evolve according to the knowledge and money that I want and that I can allocate to it) I think it would be versatility and resilience.
- Versatility because I do not have the financial means to manufacture and own different vehicles specific to each of my needs and even so, it would not be my will. So I wanted a bike, because I love cycling, that allows me to do without a car as often as possible, that allows me to carry all kinds of things (I’m always tinkering and transporting equipment) and that allows me to roam and/or travel; All this at a higher speed than with a machine without assistance.
In addition, I have always done a lot of mountain biking since my youngest age as well as many years of trial competition and it was therefore unthinkable for me to have a bike that does not pass “everywhere” and to have to turn back because of a chicane, to deprive myself of a beautiful forest trail, hazardous paths in the mountains, a bivouac by the river because of an embankment or simply a track not passable by other bikes more typical road. Finally, I found it interesting to make a bike that “folds” and carries quite easily, especially to store it in the bus in which I live. - What I mean by resilience in this context is the sustainable and repairable aspect of cycling. I try to choose the materials, their layout and the different components so that they are not only resistant to the use I intend to make of them but also repairable if something were to break. For me, resilience goes hand in hand with simplicity (which remains relative because solar bikes remain “technical” machines). Naturally, all this is often done at the expense of weight. FYI, I searched for about a year for the ideal basis for my project through most of the solutions we currently know.
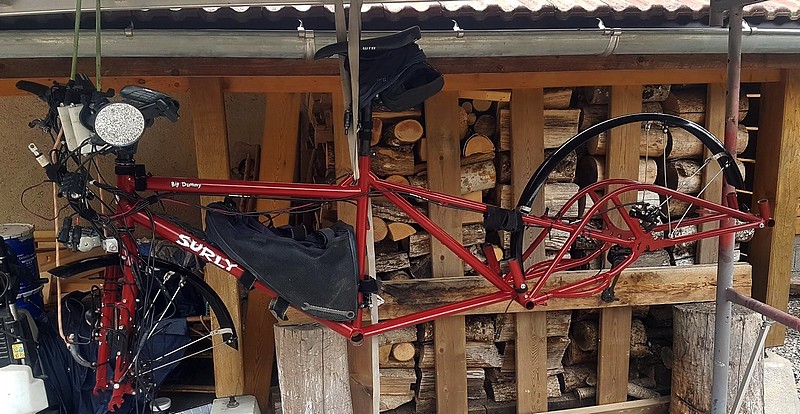
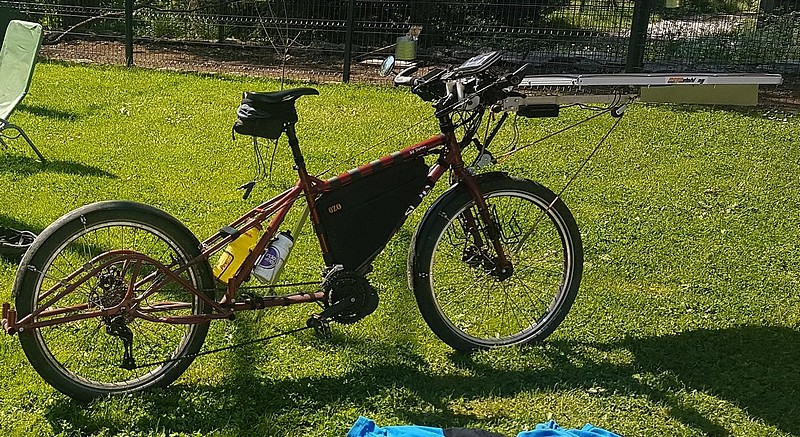
The best compromise I found for me is a longtail cargo bike (literally “long tail”, so lying in the back rather than in the front like most cargo bikes): the Big Dummy model from the famous American brand Surly.
Here are the features that I liked about this base:
- Chromo 4130 steel frame and fork of reputed robust design.
- A multitude of possibilities of modifications because many eyelets and reinforcements on the entire frame and the fork and system “Xtracycle” at the back (4 vertical round tubes and two standardized horizontal through from which we can imagine an infinity of uses).
- Free triangle in the frame at the back of the seat tube to accommodate a remote engine (something I have had in mind since the beginning and that I intend to achieve!)
- Only two wheels: more maneuverable, less stress (less twisting and easier to avoid holes), lighter, better performance.
- Two wheels of the same size (fewer different parts), in 26 inches (much better in crossing and more choice of off-road tires)
- Can accommodate very wide tires (up to 3 inches!) This is often limited on other travel and/or cargo bikes.
- Mountain bike geometry, drives like a classic bike with simply a turning radius a little increased due to a longer wheelbase.
- Optimal weight distribution sitting in front and the bulk of the (loaded) weight remaining rather at the back = very stable and increased traction, especially uphill (possibility to climb extremely steep slopes without risk of rearing or skidding).
- Quite comfortable: the fact of sitting between the two wheels unlike other straight bikes where you are almost above the rear wheel makes the shocks much less violent, especially with a steel frame that will deform more and absorb part of the shock. The fact of being able to mount large “balloon” type tires, coupled with the weight of the machine erases most of the imperfections of the ground. With a suspended seatpost, the bike is relatively comfortable.
Detailed technical description
Note: The bike is being modified and many elements are subject to change.
Cycling
- Frame/Fork: Surly Big Dummy steel Chromoly 4130.
- Rims: Remerx Jumbo (I trusted Guillaume de Délic Éco who told me that it would not move, otherwise I would take even stronger. I don’t want to compromise on wheels).
- Tyres: Schwalbe Super Moto X, 26×2,40
- Brakes: Avid BB7 road S 180 mm. At first I thought of mounting big hydraulic brakes but I am amazed at the effectiveness of these brakes and especially their simplicity. Especially since with regeneration I hardly brake anymore.
- Transmission: until then I had a Bafang BBS02 pedal motor with the following ratios: 32/48 chainrings and 10-speed cassette modified and deported in 9 speeds 11/36. This gives me a very wide range of gears allowing me to drive at very low and very high speeds. Note: There are tips to keep the front derailleur with the adaptation in double trays as well as to modify the cassettes and correct the chain line (see paragraph “tips and tricks” at the end of the article).
- Dimensions: Width: 80 cm, Max total length: 345 cm, Height: 100 cm
- Curb weight in running order: 51 kg (with pedal motor only. I should stay below 55 for the “final” version).
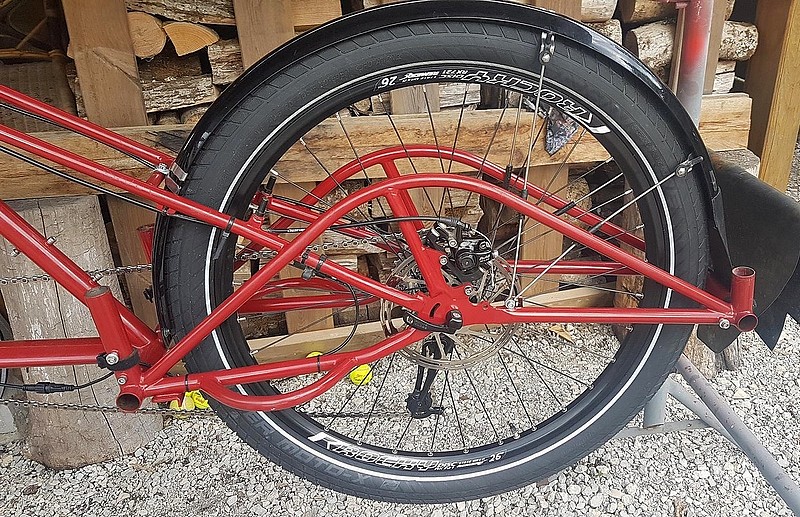
- We can guess the robustness of the design in these photos.
Motorization
At first, I had neither the time nor the money to do otherwise and I was too eager to travel by solar bike so I opted for a Bafang BBS02 pedal motor which seemed to me to be the simplest, versatile and economical choice. In view of my participation in the Sun Trip Alpes 2022 it made much more sense for me to have a pedal motor rather than a wheel motor. However, I knew that this solution was temporary and that I would change. By buying this bike, I already imagined using a remote motor as others have already done (that is to say, a motor that drives the wheel via another intermediary than the bottom bracket or the hub itself). I was particularly interested in the work of Bernard Cauquil and the concept of the direct drive motor coupled to an integrated speed hub with a transmission on each side; one for transmission, the other for regeneration.
After two years of reflection, I chose bi-motorization : 1 direct drive motor in the front wheel and 1 remote motor for the rear wheel.
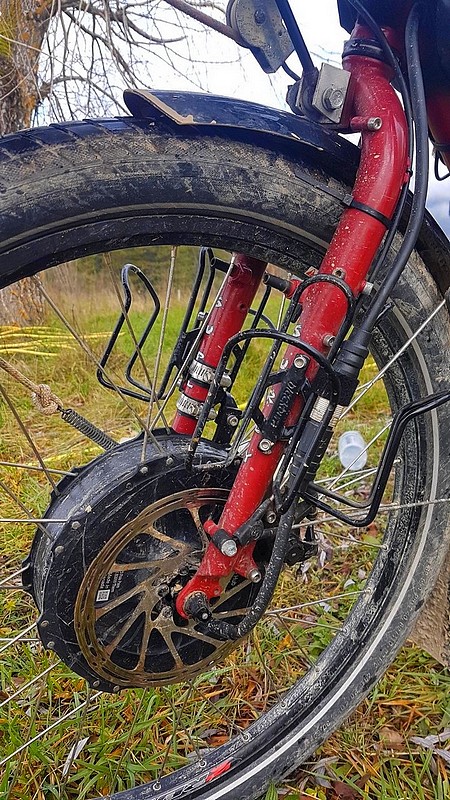
Front wheel motorization:
- Grin Technologies All-Axle engine (7.5 RPM/V) mounted on Remerx Jumbo rim with e-strong sapim spokes. This engine therefore makes it possible to benefit from regenerative braking.
- BaseRunner V5 Controller
- Cycle analyst V3 solar.
Rear wheel motorization:
Several ideas are being studied but here are the ideal specifications:
- Motor offset in the rear triangle of the frame
- A direct drive would be the best (reliability+++)
- Original transmission completely free (so probably a left-side drive)
- Retention of disc braking if possible
- I want a huge torque (I would like this motor to hoist the loaded bike without difficulty for example in a staircase or a very steep ramp)
- Assistance up to about 20 km/h (if necessary I imagine being able to derail it on two different sprockets depending on the use of the moment and / or derail it on a “crazy” pinion)
- Baserunner V5 and Cycle Analyst V3 to have a duplicate of the parts that I consider sensitive.
- Total independence of the other motor except the battery.
- Maybe the possibility of clutching a fixed sprocket for a low-speed regeneration that I would sometimes need (have a direct drive that turns fast at low speed) because I regularly reach the limits of heating of the front engine in regeneration (very steep and / or
uneven slope that do not allow to drive fast). - Reliability: robust design at all levels.
Here are the reasons for this choice:
- Optimal resilience: three independent machine movement systems: motor1 / motor 2 / pedals and duplicate controller and Cycle Analyst.
- Two-wheel drive (interesting for me who is regularly in paths; especially since for the sake of versatility I do not use tires with many studs).
- It’s also interesting for me to add weight to the front of the bike in terms of load distribution rather than concentrating a “big” system still at the rear.
- Almost infinite possibilities of adjustment in terms of the vehicle’s capabilities (including available torque, which interests me the most).
- Better distribution of forces on the mechanics by dividing on two wheels.
- Similar weight see less than a single assembly with DD / Rohloff / generator
engine TO BE CONTINUED …
The battery
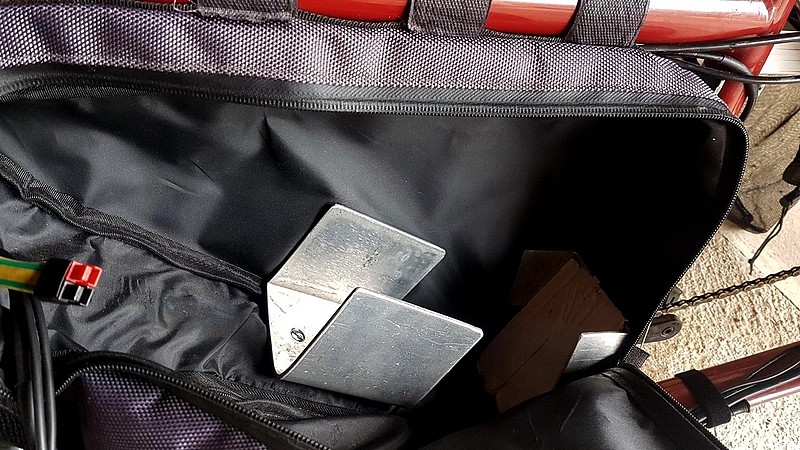
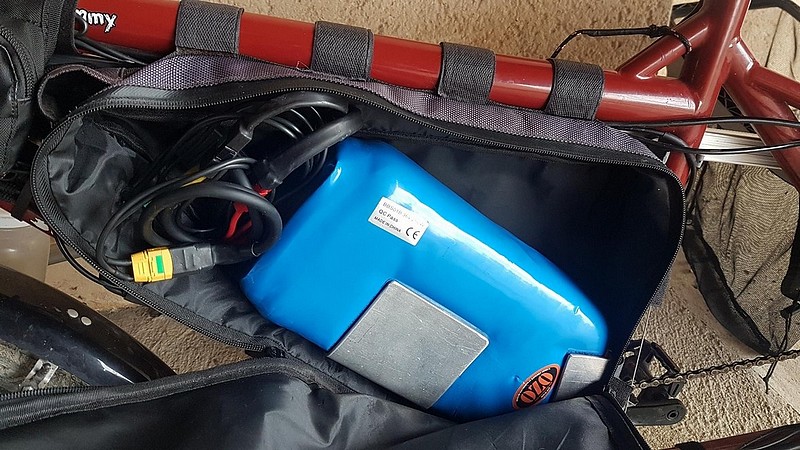
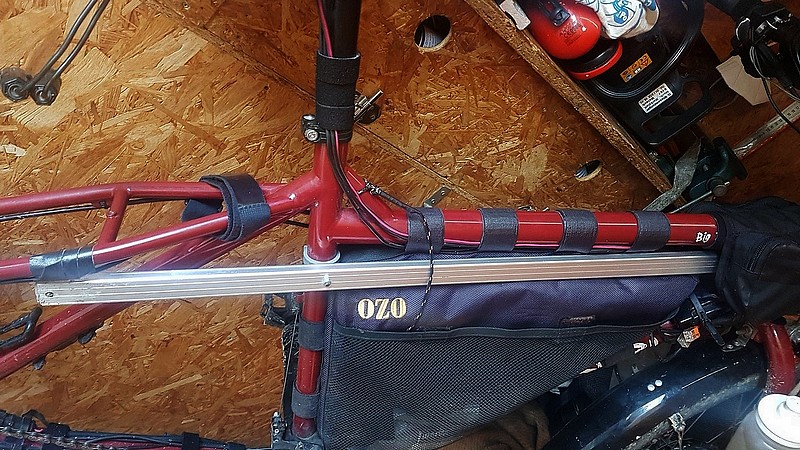
Rated voltage 48 V – 1200 Wh . The battery and its connectors are located in the central bag of the frame. It is protected by additional foam and is held very securely by two aluminum flanges screwed into original eyelets of the frame through the bag and is thus completely protected against impacts. This location also allows you to add weight to the front part of the bike.
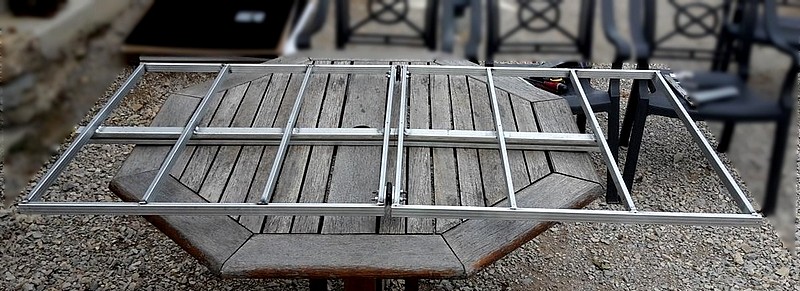
Solar panels and load-bearing structures
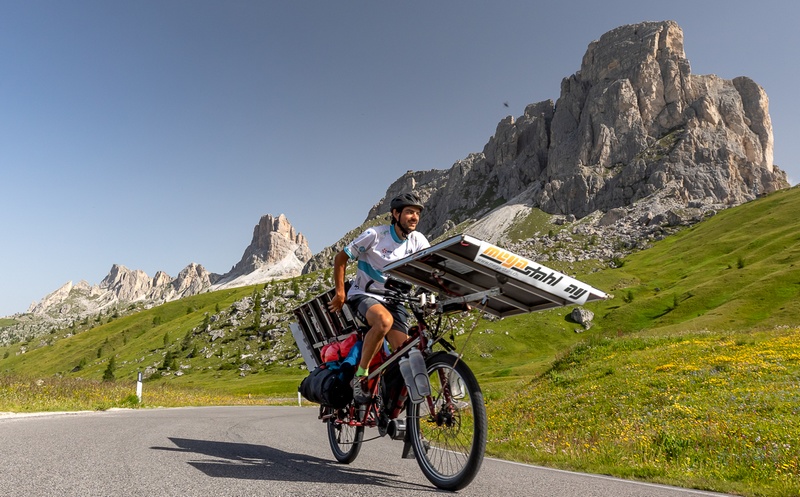
Although I hesitated to make a solar roof in the manner of Sybille and Daniel, I preferred to reduce the wing and opt for a more stable configuration that allows me increased mobility by betting on a cantilevered panel at the front and that if my panels were very easily and efficiently steerable, I would partly compensate for the lack of surface.
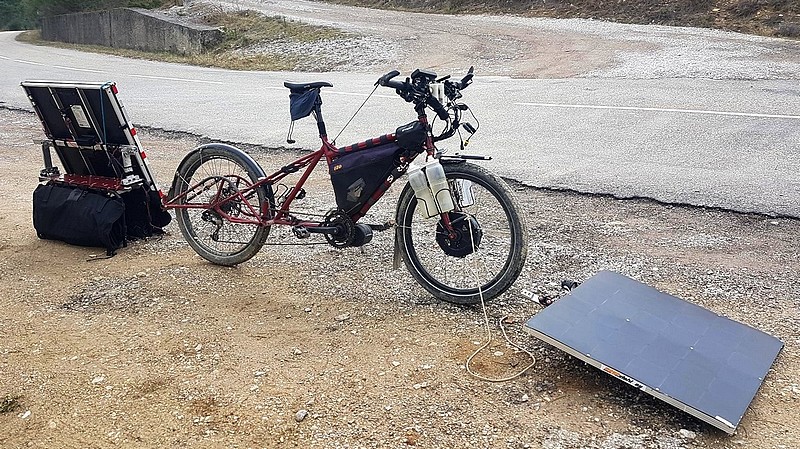
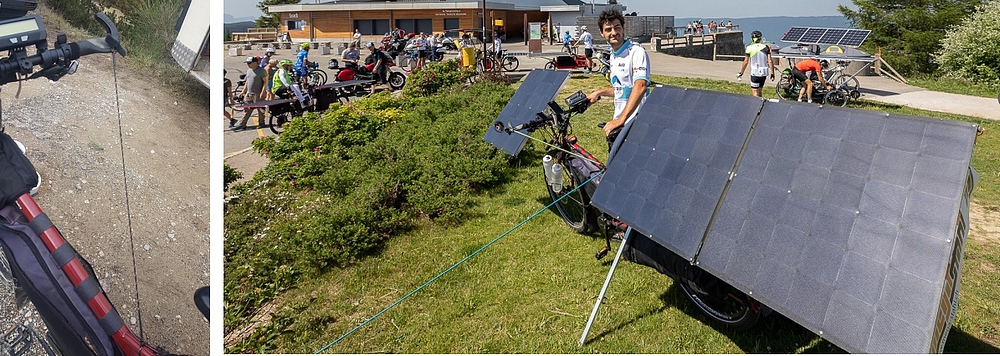
The fully assembled bike therefore has 3 solar panels of 120Wc “Sun Travel” (360Wc) fixed on welded aluminum tube frames: 1 front and 2 rear.
Each panel has its own regulator. At first I had connected the two rear panels in parallel on the same regulator but it was a mistake. I thought that if one panel was a little shaded the other kept all its production but this is not the case! A little shade on a panel and the entire production drops by more than half. So I added a third regulator. It is more efficient in this arrangement where it is quite regular that I shade the first panel behind me and it is especially more resilient: it makes a backup regulator.
Front panel:
What seemed most intuitive to me at first was a panel attached to the frame but I quickly found several flaws in this:
- Inability to tilt the panel from left to right by having a wide angle of inclination and / or keeping the possibility of turning the handlebars fully because once tilted, the handlebar hits in it! Or it is necessary to increase the overhang so that the beginning of the panel begins at a distance from the axis of the fork pivot at least equal to half of the handlebar which becomes absurd.
- The steering socket becomes the only possible fixing passage area because everything else in the front of the bike must be able to turn: little possibility, difficult to do something simple, solid and suspended (an imperative for me).
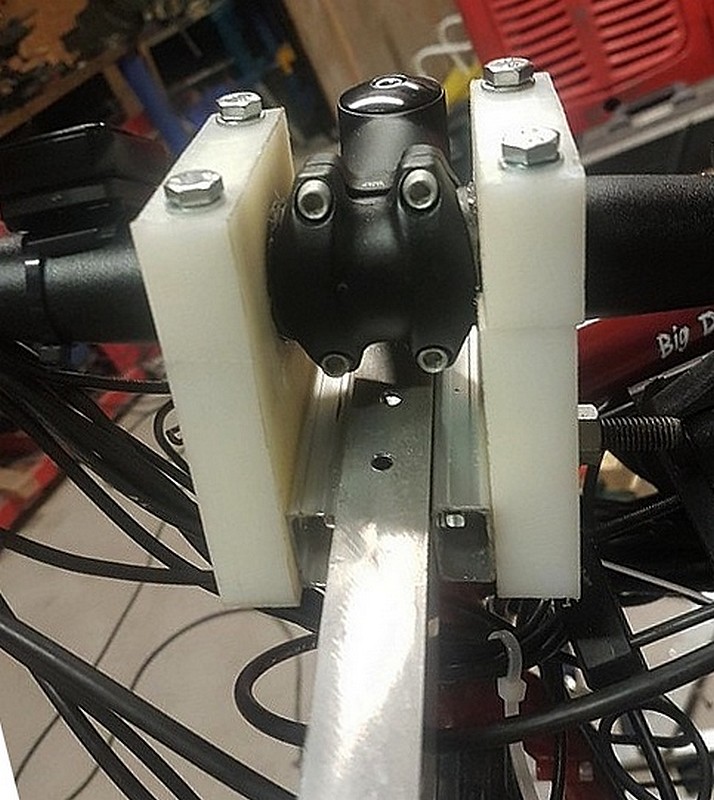
- Maximum footprint with a 3m50 machine of a block So I thought about something else and opted for the following solution: The panel is cantilevered at the front of the bike, fixed on either side of the head socket: at the top of the hanger via a polyamide part, at the bottom on the fork. It is therefore in solidarity with the management and turns at the same time as the handlebars!
Explanation:
The frame of the panel is hinged on a central tube which allows a large left/right lateral inclination. This tube is itself articulated at the level of a polyamide part at the handlebars (“up/down” joint) and it is supported by a gas cylinder whose force, stroke and angles had to be determined.
Without the cylinder, the panel falls on the wheel; With the cylinder it is held a little higher than the horizontal.
Finally, a rope is attached to the bottom of the fork via a spring and then passes through two pulleys and a marine blocker to arrive just in front of the handlebars, an easily accessible place.

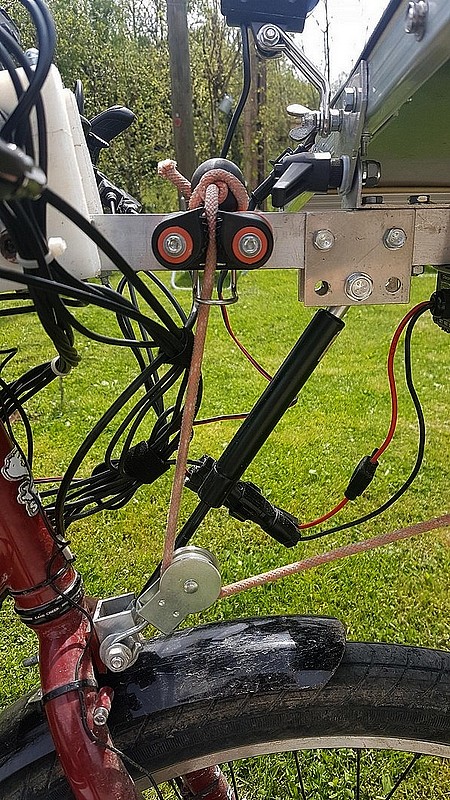
In the “normal” position, the rope and the spring are poorly understretched and the cylinder a little compressed so that the panel remains horizontal (better aerodynamics …). The interest of this “pre-load” is to be able to also absorb the stresses upwards (equivalent to the SAG of a rear shock absorber of mountain bike if you want …).
By pulling on the small ball that ends my rope (to be able to take it easily) the cylinder compresses, the panel tilts and I can choose the angle I want by blocking the rope where I want on the blocker.

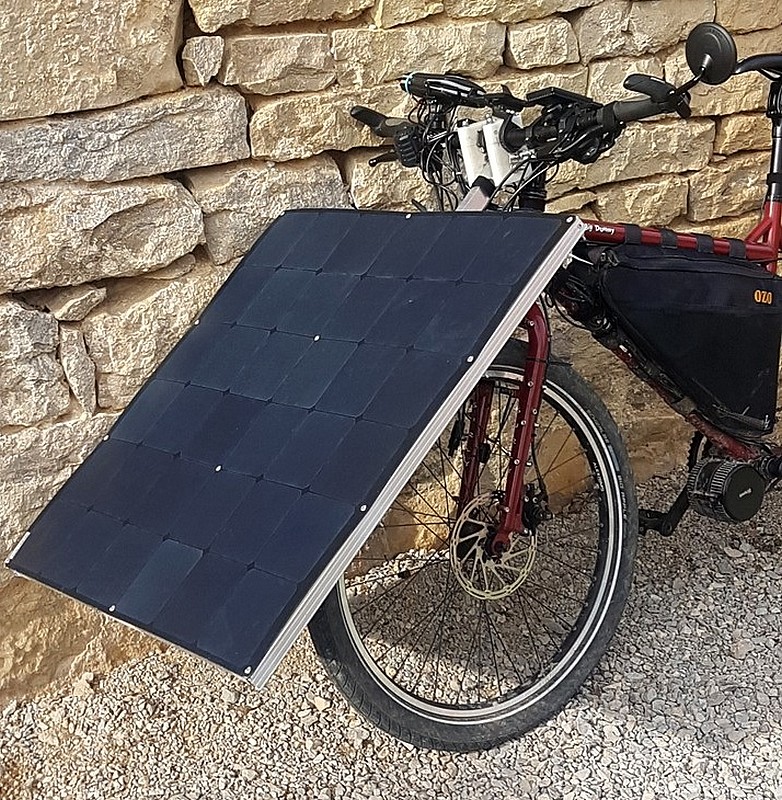
Thus, the sign is very well suspended and mechanical stresses are minimal on this structure, even in rough paths or when going down a sidewalk. In use, it turns out that I use this feature very regularly; to “go everywhere” and
obviously to increase production when the sun is “ahead”. To get an idea, I would say that this increases the production by 30 to 60 watts in sunny conditions (depending on the conditions), or 25% to 50% of the nominal power of the panel!
Of course this is completely anti-aerodynamic and only makes sense under certain conditions (mainly at low speeds).
This set is removable very quickly if necessary, only two nuts of 8 and three quick connectors are to be removed and it comes out by itself.
This solution is in my opinion ideal to add a panel to the front of a straight bike in terms of solar efficiency (possible inclinations) and the bike’s ability to pass in many places: the bike folds in half by turning unlike a long bike all in one block which makes it possible to “break the angle” to pass between two tight trees or turn after a door for example. It also offers the possibility of fixing or suspending the assembly securely having two attachment points far from each other (fork and hanger).
This is naturally weighed down and the various stresses suffered by the panel (mainly the wind) affect the direction directly. Driving in this configuration is therefore more tiring for the upper body, especially for the shoulders! This is also more dangerous so requires proper assembly and special attention.
The panel must in no case be able to tilt without our intervention! From 40km/h the stress exerted from the front on the panel by the wind is enormous (depending on its size obviously). The panel must therefore remain horizontal to reduce wind support as much as possible and the structure must not give way. In other words, in my case, the cylinder must push harder than the strongest headwind I can encounter, panel tilted forward (so be much more powerful than “mixed” position what it takes to simply hold the panel stationary).
During my first tests the cylinders used were never powerful enough: as soon as the speed increased (and therefore the headwind) there came a time when the wind compressed the cylinder (often following a deformation on the road which compressed the cylinder a little thus offering a better wind grip of the panel) and the panel went down immediately, tackled by the wind. The panel thus fully exposed to the wind then turned immediately to the right or left if the left/right tilt system was also too weak. FYI the cylinder I installed is 300N.
Remarks:
- The smaller and lighter the panel, the fewer constraints there will be
- The wider the handlebar, the easier it will be to turn and, if necessary, retain
- The shorter the overhang, the less “lever” the wind will have to turn the handlebars.
- But the longer the overhang, the less shade the panel will be
- After many tests, I managed to find correct settings and I feel very safe with this setup. I ride regularly with this panel inclined to the side and I regularly went down to more than 70km/h before being limited by the wheel motor.
Despite the need that the panel cannot rotate alone, it is very easily manipulated manually without effort which allows me to move it continuously while driving. I still plan to improve the left/right tilt to secure all this again and maybe add the possibility of locking it horizontally. Perhaps I will provide an update on this later.
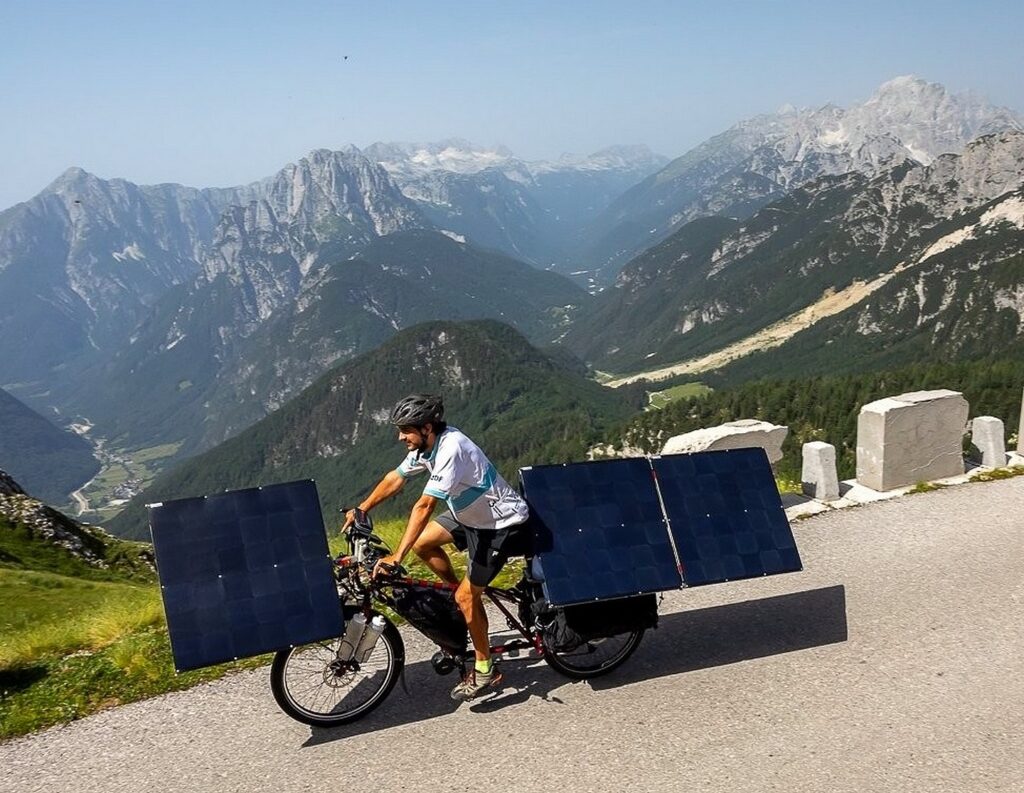
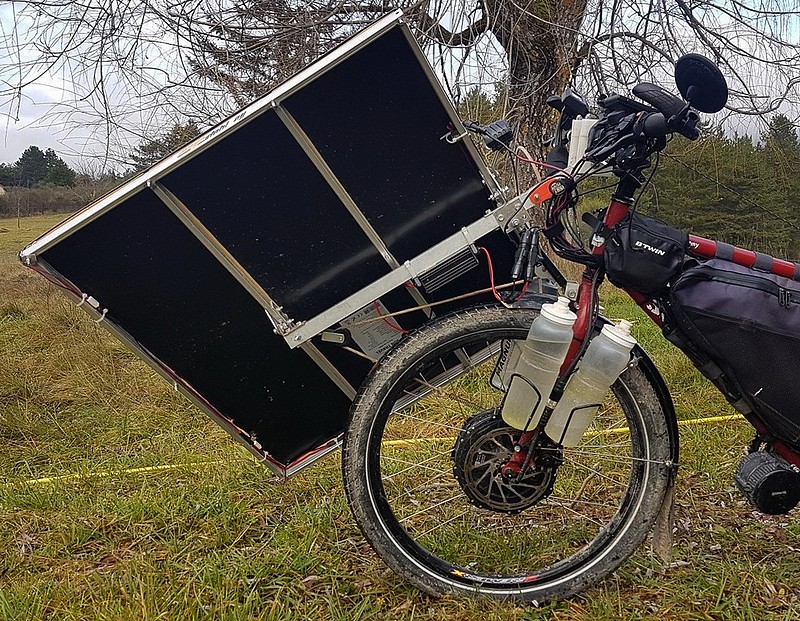
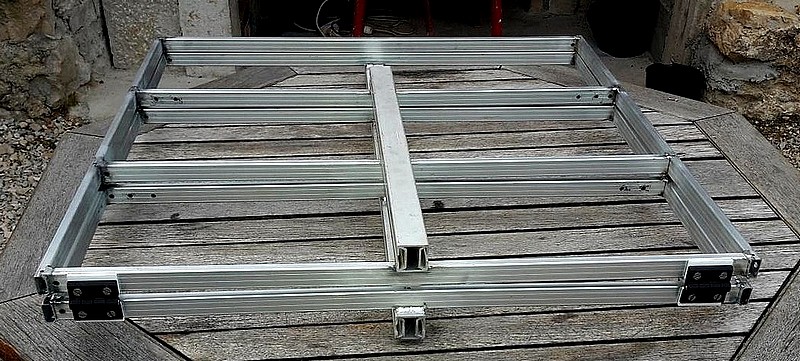
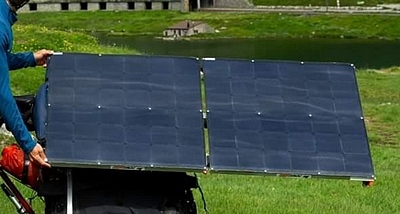
Back panels
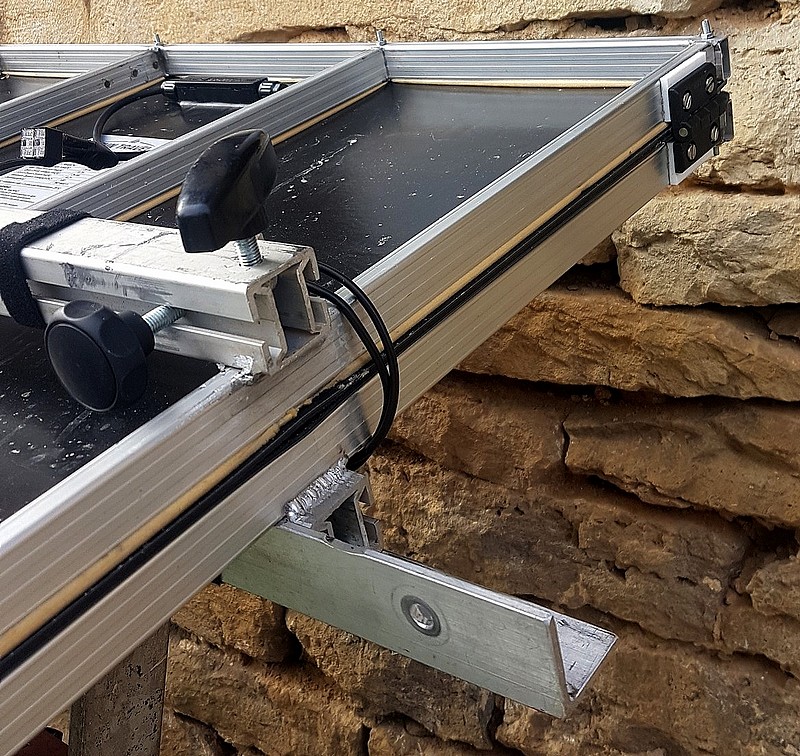
These two panels are fixed on the transport frame of the bike that I reinforced and lengthened. One panel is above the luggage rack and does not exceed the plumb of the bike, the second is entirely cantilevered at the back of the bike.
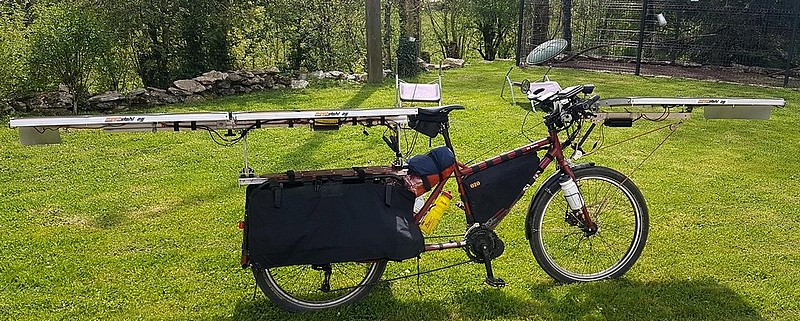

Just like the front panel, the structure is made of welded aluminum, this time on a much stronger central tube. Hinges and a clamping system make it possible to quickly open or close the rear panel on the front panel, significantly reducing the size of the bike or assembly if it is disassembled.
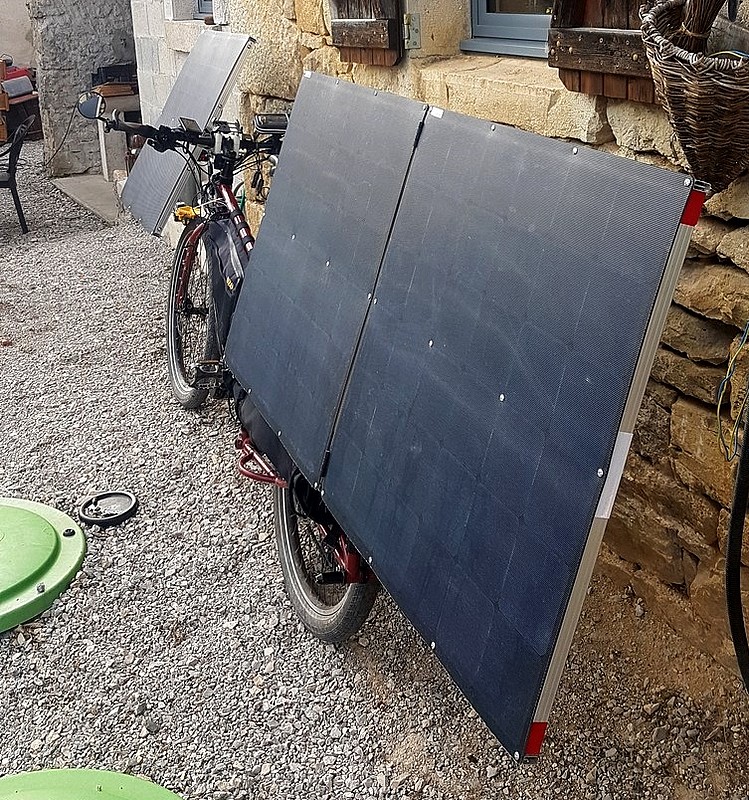
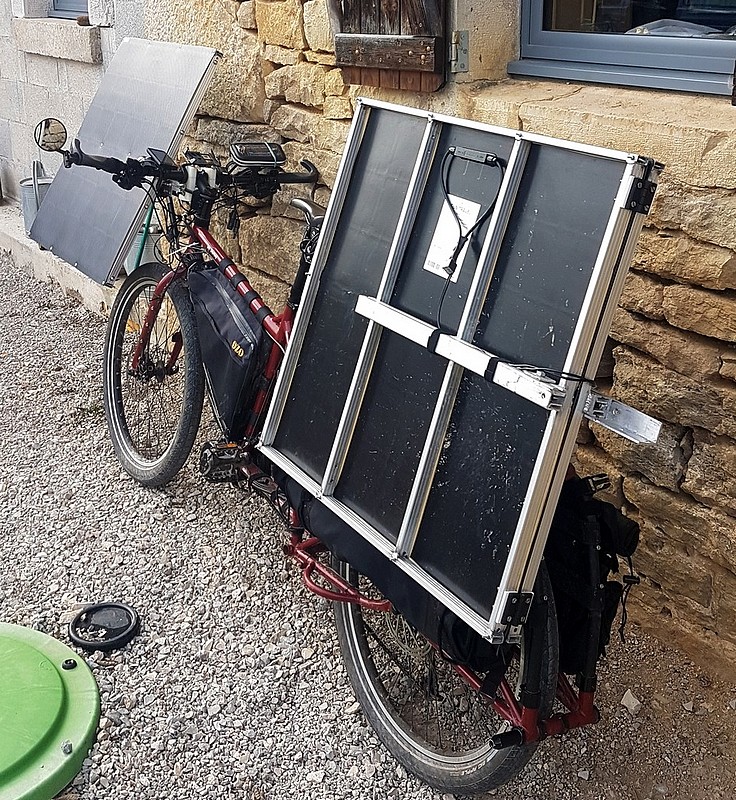
And also like the front, the complete set (frame / bag / panels) can be quickly disassembled if necessary (narrow passage, storage …)
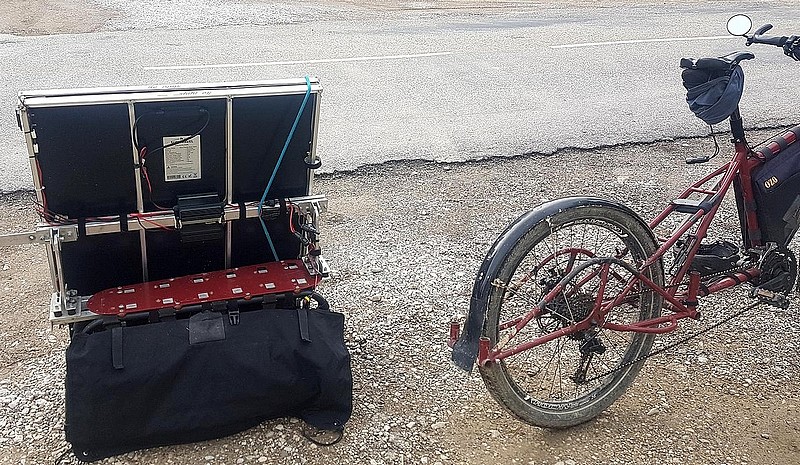

Of course, there is the possibility of mounting only the rear frame and panniers without the panels to carry things without the clutter of the panels
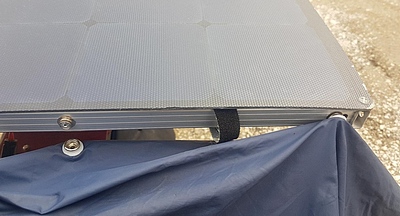
The two pillars of the panel structure are each attached to the bike via 4 silentblocks that offer great flexibility to the whole and relieve the bike of many constraints.


These silentblocks being designed to withstand shear and compression forces but not tearing, I added the two 6 screws with a piece of rubber (orange square) to limit the rebound stroke and avoid a potential tear. I had done the first tests with a totally rigid structure and, beyond the much less pleasant driving, the mechanics were already starting to suffer damage (split welds, deformed screw heads…)
Having a more flexible structure changes dramatically.
I am quite satisfied with this editing even if it has its limits. I am thinking about making a real suspension for the rear panels see the entire rear assembly (panel + panniers) which could also allow me a small inclination “up / down” of the rear panels according to the same principle as at the front, by compressing a shock absorber.
Right / left tilt:
The method is simple in itself (two squares tighten an “upright” sandwich) but still required some fine-tuning. A thin sheet of Teflon sits between the brackets and the upright providing a regular contact area with ideal friction (while aluminum vs. aluminum wears out quickly and tends to “stick”). Then a Teflon washer and a metal washer are placed between the brackets and nut on one side and the screw head on the other. Once tightened properly, this system works perfectly and almost never needs to be touched: the panels move easily by hand and a strong wind does not make them turn.

The BTR screw of 8 mm and the square nut that self-locks on the screw head next to it allow me to tighten the whole very quickly if necessary as is sometimes the case in paths that shake a lot or when it is very cold and the metal retracts. A little key stroke is enough. I will put small indexable handles to tighten without key.
The structure is quite rough and massive but there is a possibility of saving weight by lightening the parts and / or welding to remove any screws.
Adding suspension would not weigh down the bike, I think, because the reduction of stresses would lighten everything and compensate for the weight of the suspension, the current assembly being disproportionately strong.
Note:
At first I thought to articulate the 3 panels on the same axis. Apart from the problem of the almost impossible inclination of the front panel with a rotating handlebar, this would not have been “effective” from a photovoltaic point of view.
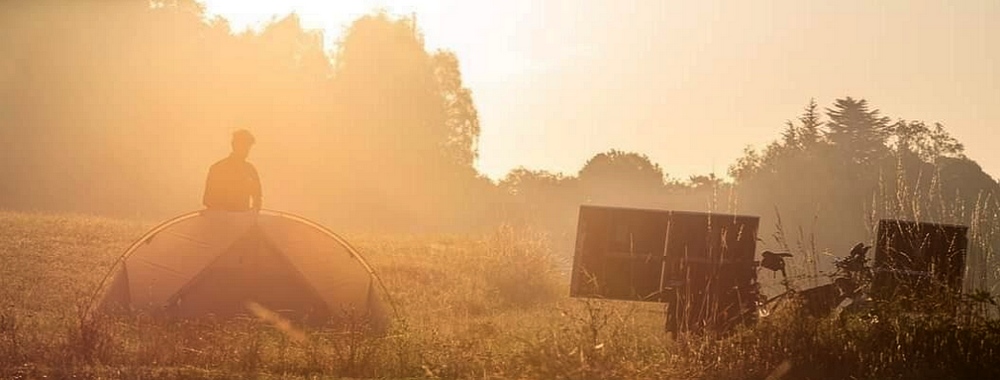
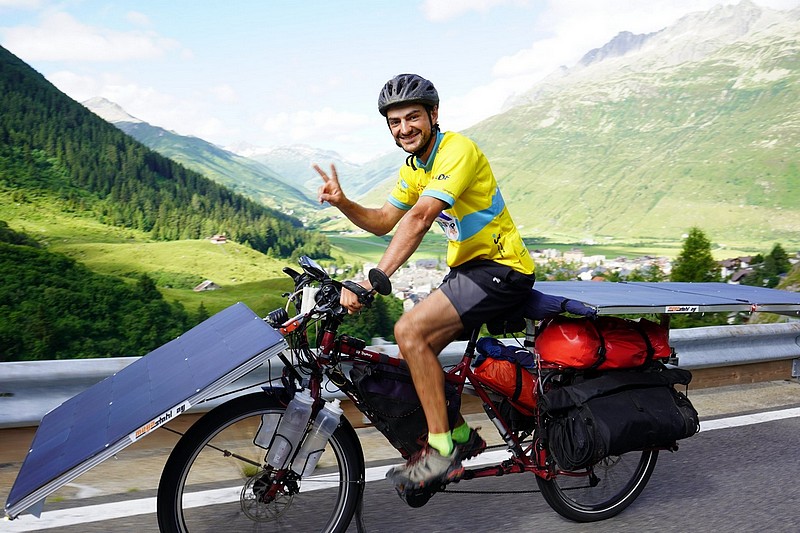
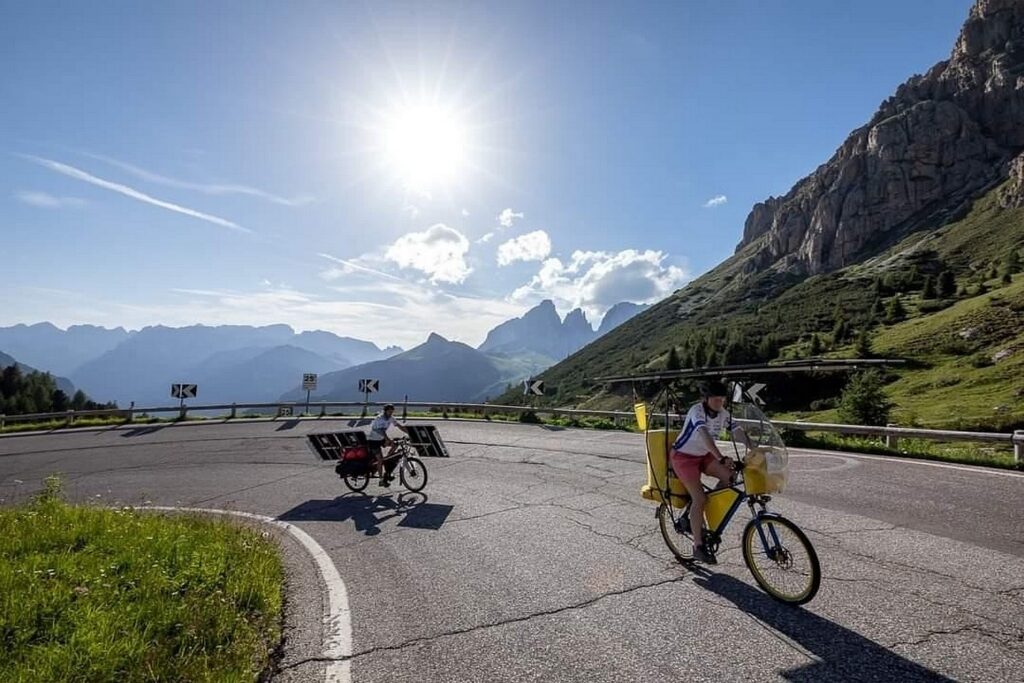
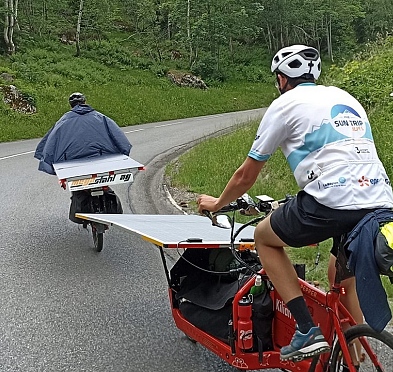
Indeed, it is rare that the front panel is inclined at the same angle as those behind mainly for two reasons: my shadow (see photo) and the crosswind: if there is a lot of wind, I tilt little or not at all the front panel which is very sensitive to crosswind. On the other hand the bike remains very stable with the rear panels inclined at full slope even with wind. It really has to blow hard to force me to leave everything horizontal.
It is necessary to learn to anticipate the gusts: overtaking / crossing of heavy vehicles, entrances and exits of tunnels or bridges, lateral avenue in town, end of hedge or wall in plain etc …. This may come as a surprise and some have already paid the price.

In this example, the front panel is in the “optimal” position and the left corner of the back panel would be in shade if it were not tilted slightly. Similarly, if the sun is low in front, a little to the right, the front panel would be lowered and the rear panels tilted to the right (less optimal orientation but no shade = better performance).
In my opinion, this is a weak point of automated systems, especially on bikes without a solar roof (so with a lot of projected shade): the reality of the field is more complex than simply monitoring the sun (our shadow, trees, buildings, clear or veiled sky, redundant pins, slope of the road etc …). I can not imagine the complexity of an automated system on a bike like mine with panels in front, behind, tilting on 2 axes, which must be solid, suspended, fast etc … if we want to play electron hunting. I much prefer the manual and solid solution: I take the panel by hand, I put it without forcing where I want it to be, it stays there.

During the Sun Trip Alps, I tilted my panels continuously and it did not bother me because my system is fast and simple.
Electrical connections / connectors
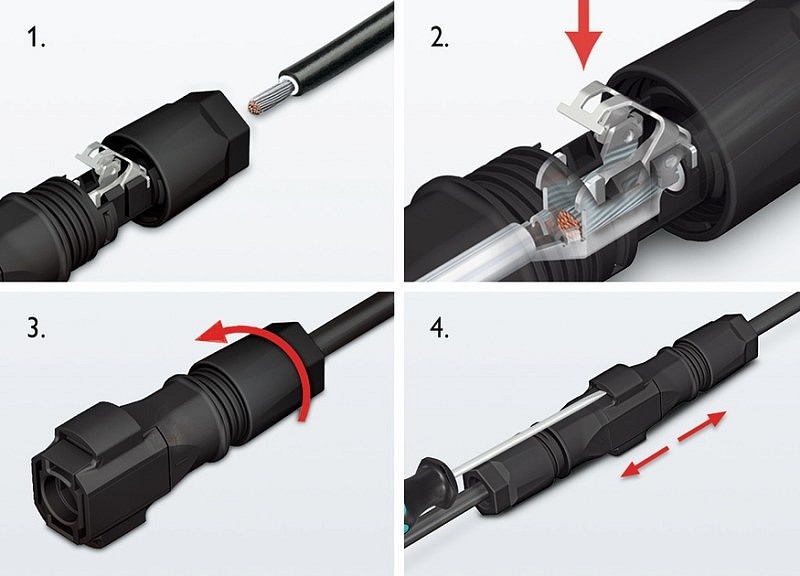
The panels connect to the bike via waterproof “Sunclix” connectors from “Phoenix Contact”, which look like the MC4 but disconnect easily and have an effective cable pinch system that allows them to be disassembled and reassembled as long as you want: waterproof, solid and very easy to modify the installation if necessary.
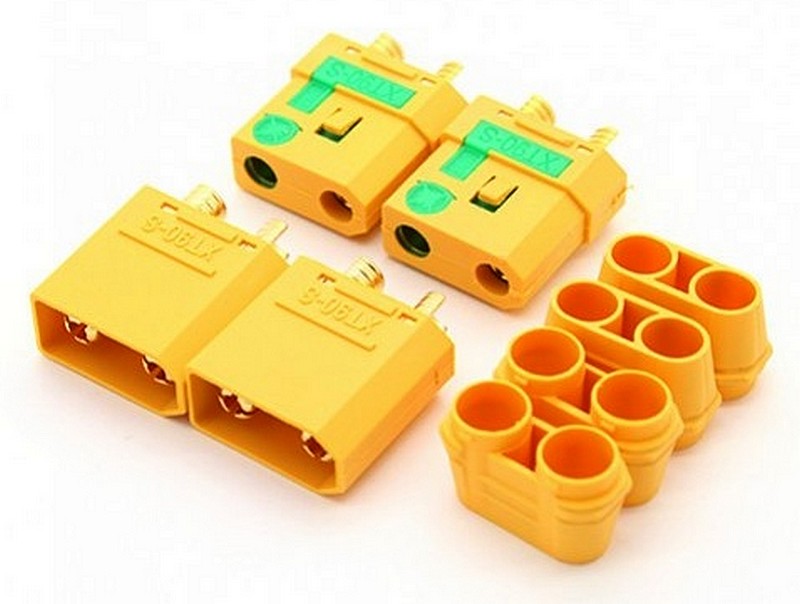
For power connections, I chose to put XT90S connectors “anti spark” (anti-spark) that offer me a large margin of safety (90 Amps) and protect the electronics when connecting.
.
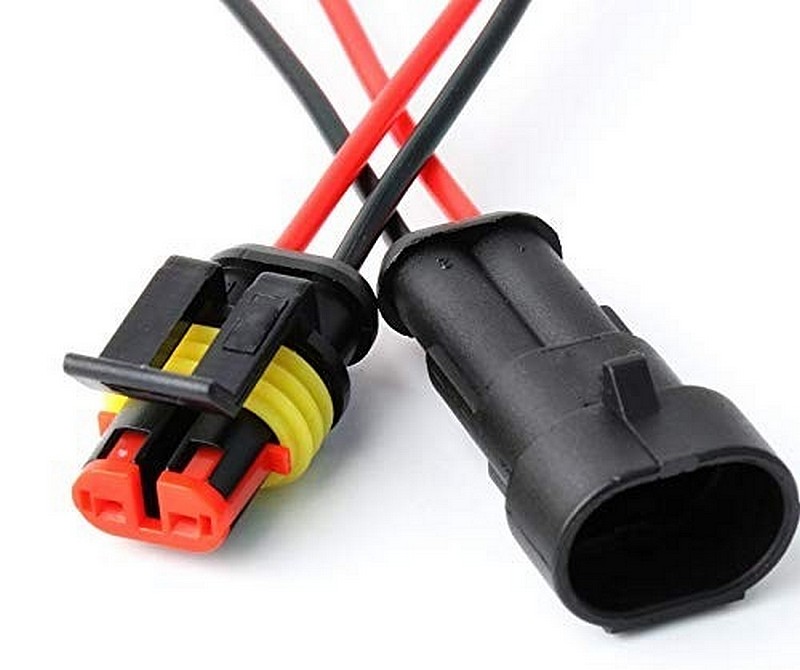
For small power connectors (USB charging, LEDs, headlight …) I used these small waterproof connectors that are easily found.
Accessories
Lighting
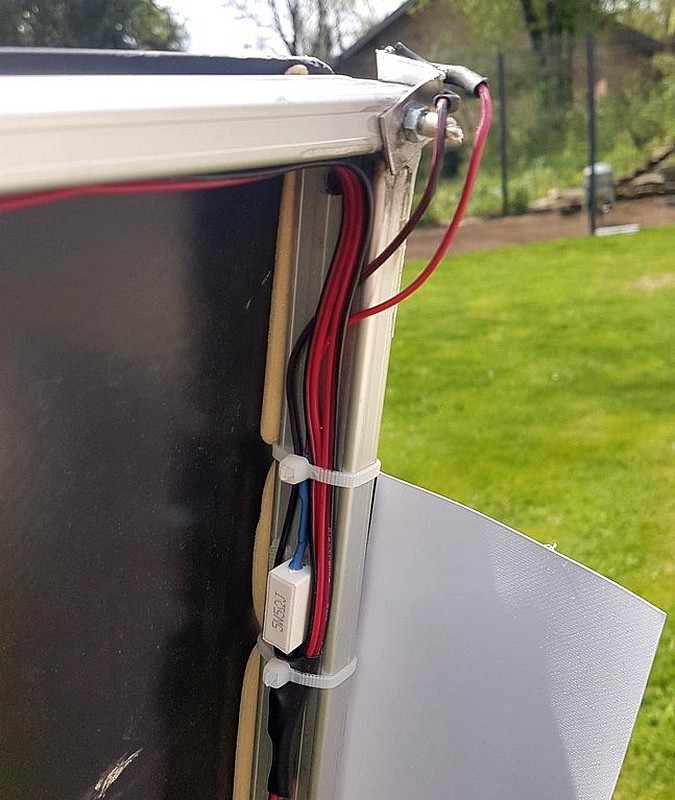
I put small LEDs to indicate the size of the bike: 2 white at the front corners, 2 red at the rear corners and 2 red laterally which are found at the back if I ride at night the back panel folded. It’s the same principle as on Sybille and Daniel’s bikes from whom I borrowed the idea. They are powered by a 5V converter and it is necessary to correct the voltage using one or more resistors according to the operating voltage of the LED (variable according to the type of LED, its power, its color) and the connection that one wishes to make (series or parallel). I glued them double-sided on a small piece of 1 mm aluminum sheet bent at right angles.
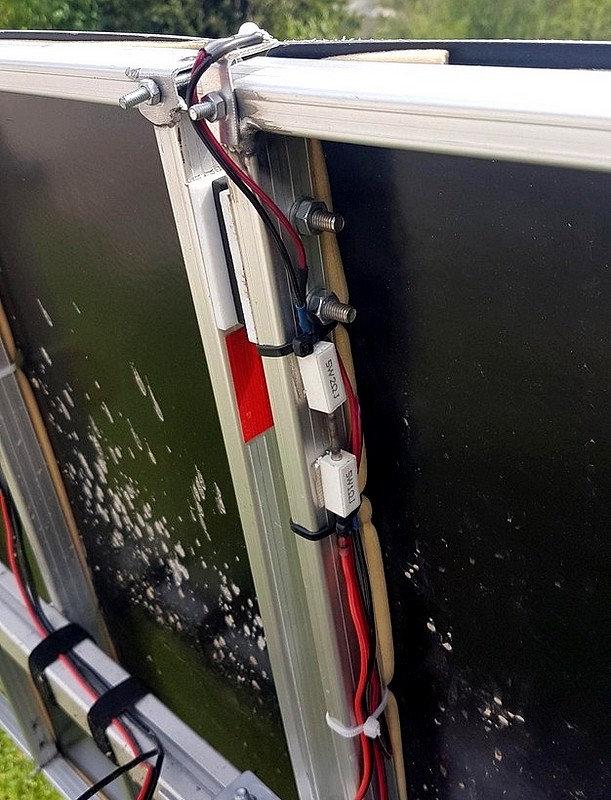
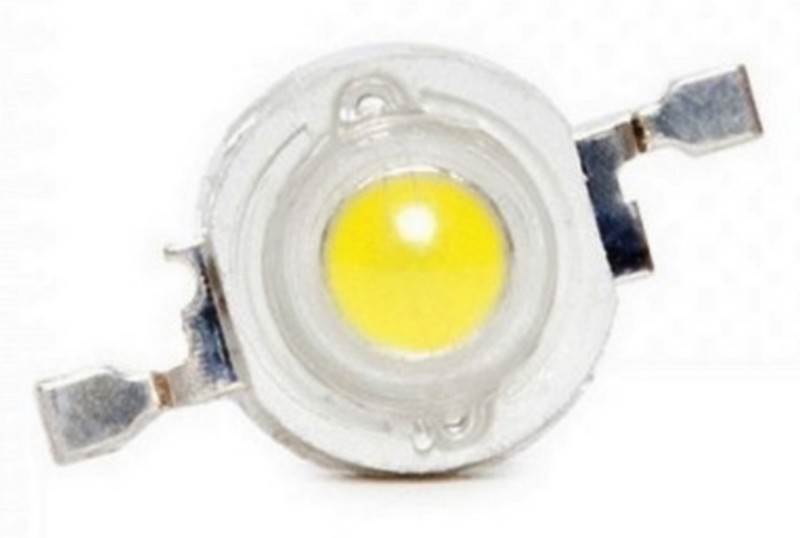
It’s very small, the consumption is very low, it’s very cheap and it lights up super well (daytime photos do not reflect their intensity). These models also exist in 3W but personally I find that 1W is more than enough.
I also have a more powerful headlight to ride at night.
Crutch
For the kickstand, I took an aluminum tube, I tucked in a small aluminum dish at the end that I tapped to attach a PVC pipe collar to the diameter of the head socket. I put another one at the diameter of the seat tube at the right distance on the side and voila: I had a very light crutch all solid!
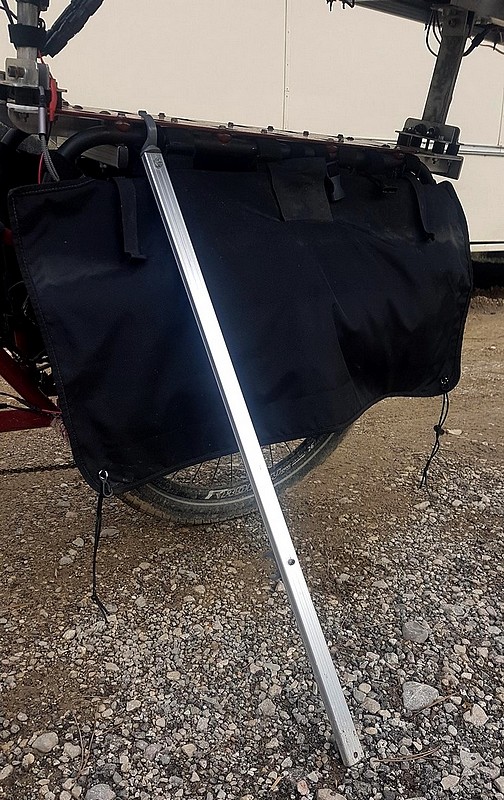
This solution is simple and light but has the disadvantage of not holding the kickstand that can slip. This makes it unusable on smooth surfaces (tar type). It is therefore necessary to find a soft surface, a hole or a stop (sidewalk ..) to prevent it from slipping. I’m thinking about making a double kickstand wide and robust (but therefore heavier …)
With my bike more than with others, the handlebars fall to the side where the bike leans if it is not held, so I added a small string that I pass around the horn at a standstill to hold it straight and that I stick on the frame with a small piece of velcro when it is not in use. Apart from the fact that it can slide, this kickstand is very practical and very stable because of the height of its attachment point.
In high wind, I add a tensioner that pulls the handlebars to the left so that it does not go in the other direction (the green) and in very strong wind, I add one (the blue) that supports the bike on the kickstand that I hang on the ground using an Allen key of 5 that I always have quick access in the bag as a sardine. Thus secured, it is almost impossible to drop the bike.
Rain cape
This cape is attached to the frames of the panels behind the saddle and in front of the handlebars by snaps. It allows me to protect the stationary bike but also to protect myself if I want to ride and it rains hard.
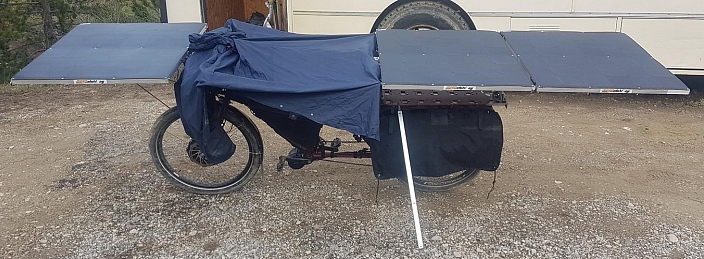
I will improve this system by strengthening the cape at the pressure level (one tore under the weight of the snow!) and inserting a transparent window to see the instruments on board the handlebars even in the rain.
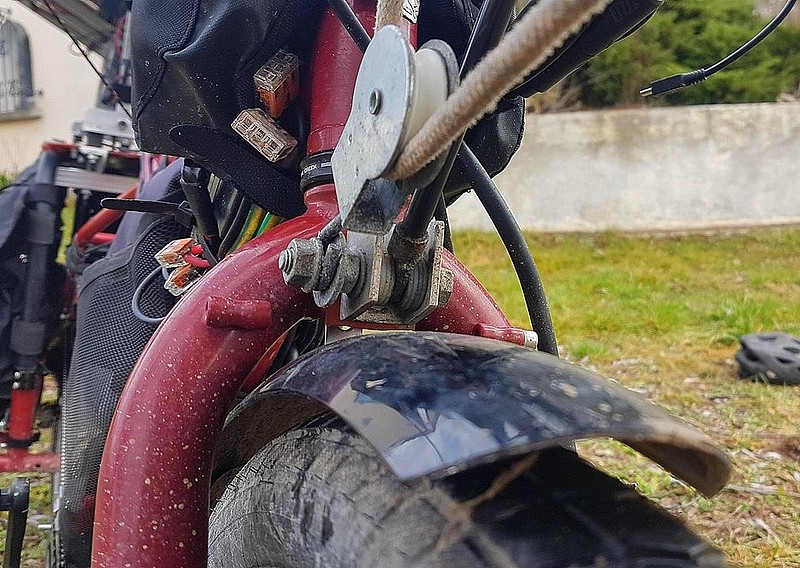
Bibs
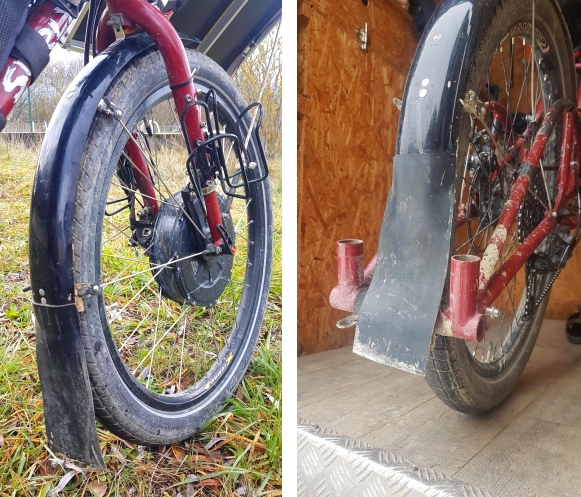
Always to be sheltered, I added large bibs to the mudguards that are already well covered. They’re just thin pieces of rubber glued to the double-sided… During the Sun Trip Alps in Slovenia, I drove for an hour in torrential rain. When I arrived, the pedal motor was dry, still dusty!
The rear bib prevents projections under the rear panel in cantilevered doors.
Feedback
Areas for improvement
The weak point of this bike is the fatigue of the cyclist induced by the front panel in connection with the steering: the steering is heavy, it must be held and retained almost continuously. It’s tiring, mainly in the shoulders.
Positives
Stability
On the other hand, it does not affect the stability of the bike: it remains extremely stable even at peaks of speeds around 80km / h that I was able to reach loaded at nearly 80 kilos. It has very little sensitivity to wind. And I can roll without my hands for a few moments to pull up a zipper.
I have several explanations for this great stability:
- The bike is heavy and the load is evenly distributed between the front and rear.
- Having a long wheelbase reduces the “spinning top” effect that would sometimes make a bike rhyme on itself. The same arrangement of panels on a classic straight bike would, I think, have much more repercussions.
- The fact of having only two wheels allows the body to continuously and precisely compensate for balance (not possible on a trike without tilting, less direct with a trailer).
- At the front, the gyroscopic effect of the wheel stabilizes all the steering and this is surely part of what makes such a mounting possible (which seemed very doubtful to me at first), it was an advantage that I saw in putting a direct drive motor in front (more mass in rotation, more stability).
- I say this in all humility but I think it’s important to mention: I have a very good technical level on the bike and that’s definitely what allows me to be very comfortable on this bike.
Versatility
I am delighted with the level of versatility of the bike. I use it to travel of course, but also for most of my travels: shopping, going to help out a car with two large tool boxes, going to the wood with chainsaw, cans, gloves, 3 ends of one meter on each side, carrying water supplies (60 liters per trip) etc … And I am rarely limited by the type of road taken, roads or dirt roads.
Resilience
I have nothing to deplore for the moment except problems with the Bafang engine kit that I do not think to keep:
- two control screens suddenly failed without warning,
- too much wear of the transmission and engine mechanics.
All this confirms my choice of independent twin-motorization. I am quite serene with everything else. I hope the frame will hold up because it undergoes big stresses when the bike is loaded and it shakes.
Evolutions, improvements
I’m full of ideas! Here is a non-exhaustive list:
- Crutch more practical, more stable.
- Handbrake system of both wheels with locker or lockable handle by taking a second cable on the calipers.
- Lighten everything: rework prototype parts, no more welding…
- Faster, stronger handlebar lock in both directions.
- Hang the back panels.
- Centralize all electronics in a waterproof housing along the two rear stays.
- Make “wide loaders” that disassemble quickly (= two small loading trays on either side of the rear wheel) to be able to load for example water cans easily and low.
- Build a big, solid trailer.
- Find an ideal motorization for the rear wheel and remove the pedal motor.
Tips and tricks
Double tray with bottom bracket motor
One of the disadvantages of pedal motors is that they move the tray to the right, especially when adding a second tray using an adapter. This has two consequences: it is difficult to keep a front derailleur without adaptation and the chain line is affected.
For the derailleur, there are adapters on the market. For my part I managed to keep the derailleur. Since the diameter of the seat tube was smaller than that of the derailleur collar, there was a spacer. I just had to grind the spacer on the left and roughly reproduce the radius of the tube (basically to make an eccentric spacer) and grind a little the high stop of the derailleur to recover the little missing stroke.
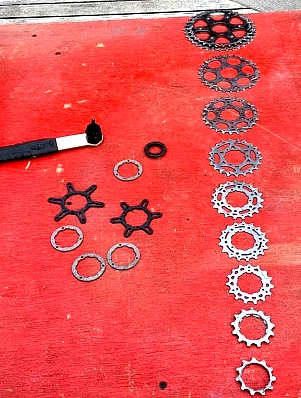
For the chain line, there is the possibility of opening the cassette by grinding the head of the three tipped axes that hold the sprockets together. Then, remove the necessary pinion(s) to put them back at the top. In this way the cassette is shifted to the right and the chain line is better when you are on the largest sprockets. Obviously, we have to adjust the derailleur again and we have lost the sprockets that we have removed. For my part, the chain being very large, I shifted a single sprocket (I removed the 19 teeth), the cassette remains well tiered and the gears pass perfectly.
If you think you will stay in this configuration and you use your engine with a lot of power, I would advise to find three axes to replace those you have ground for the torque transmitted to a sprocket is transmitted to the cassette body by all the other sprockets at the risk of damaging the freewheel body. A nail with the right diameter at the right size matted a blow at the end not to come out must do the job.
Alternative to Cycle Analyst

Until recently, I didn’t have a Cycle Analyst. Although it is very nice to have a lot of information and to be able to adjust a lot of parameters quickly without a computer, the Cycle Analyst is not essential on a solar bike. The most important information is instantaneous consumption, cumulative consumption, instantaneous solar production and cumulative production. This information can be obtained with two economical power meters. Even if the accuracy is less, it is enough for people who want to save money.
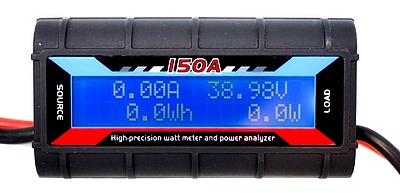
The handlebars of my first version of the bike, during the Sun Trip Alpes 2022. I had installed two power meters on the handlebars, protected in a waterproof smartphone pouch.