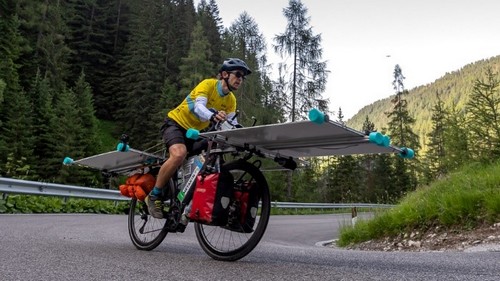
This electro-solar bike was designed from the outset to participate in the Sun Trip Alpes 2022. When it comes to circumnavigating the Alps and therefore climbing many passes, weight was from the outset the main issue that guided the design of this solar vehicle. Indeed, from a physical point of view, a machine will move all the more easily as it is light, especially on a course with a steep drop. To sum up, the less you need to move and move up weight, the less energy you will need. A light craft is an effective response to a rare and diffuse energy reservoir like solar energy.
In the end, the solar bike developed weighs 30 kg, probably the lightest solar bike of the Sun Trip. It is necessary to add to this about 10kg of luggage to be autonomous over several days. Finally, let's add 70kg of cyclist: we obtain a total rolling weight of about 110kg.
Throughout the construction of this project, I had the chance to get in touch with different partners, who helped me with their skills and design feedback. I make available the contact details of each speaker in each dedicated section. Do not hesitate to contact them for more information! EMIL1
Cycling
 [NATURAVELO – https://naturavelo.com/
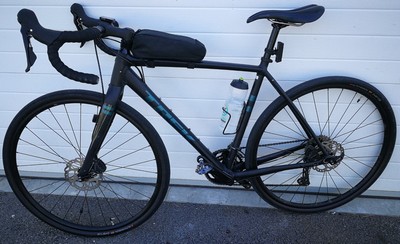
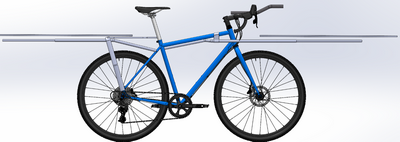
TREK Checkpoint ALR5
Aluminum frame + carbon
fork Group GRX 2×11 speeds
Tray 46-30 Casette 11-34
SMP Well
Saddle Shimano RX400 Hydraulic brakes Bike alone ~ 10.5kg
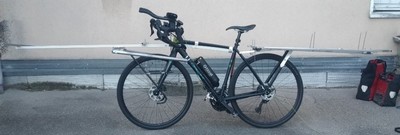
The starting point of a good solar bike is a good bike. I chose a gravel bike: a road bike with disc brakes and the ability to mount wide tires for better stability. The exact reference is TREK Checkpoint ALR5.
I chose it with many inserts to be able to moor the supporting structure of the solar panels as well as the luggage racks and other water cans. Also, I chose aluminum, to enjoy a relatively light material, but also very robust and repairable if necessary.
I also changed the original hanger for the famous Salsa CowChipper 48cm. Most road hangers are between 42cm and 44cm wide. This one is 48cm and allows to have with a good lever arm to stabilize the bike. It also ensures a substantial available space at the cockpit for the many accessories (bike GPS, smartphone, front lamp, doorbell, horn, water cans, etc.)
To fine-tune everything, I changed the original wheels for versatile and robust carbon wheels: 28-hole rims, 35mm height, Hope RS4 hubs and Sapim D-Light round spokes. To top it off, I put a pair of Schwalbe MARATHON SUPREME tires in 700x40C: very wide for maximum ride comfort. Puncture-proof, lightweight and perfectly adapted to mountain stages.
Design of the load-bearing structure
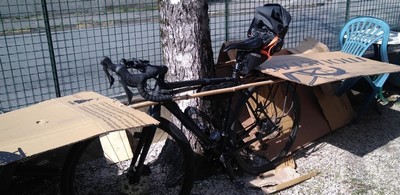
The basic idea being to add the motor, battery and solar panels to a classic straight bike, it was necessary to test it "blank". For this, nothing better than simulating the prototype with cardboard and bamboo. The cost price is zero, but it makes it possible to test the feasibility in real conditions!
Life-size realization in bamboo and cardboard. First lesson, the saddle bag is to be avoided: too much shadow on the rear panel!
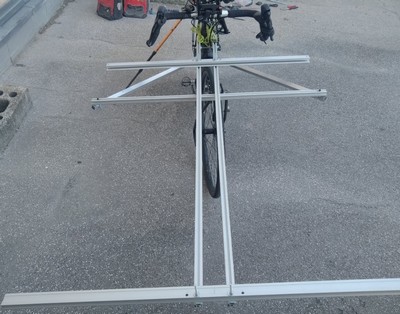
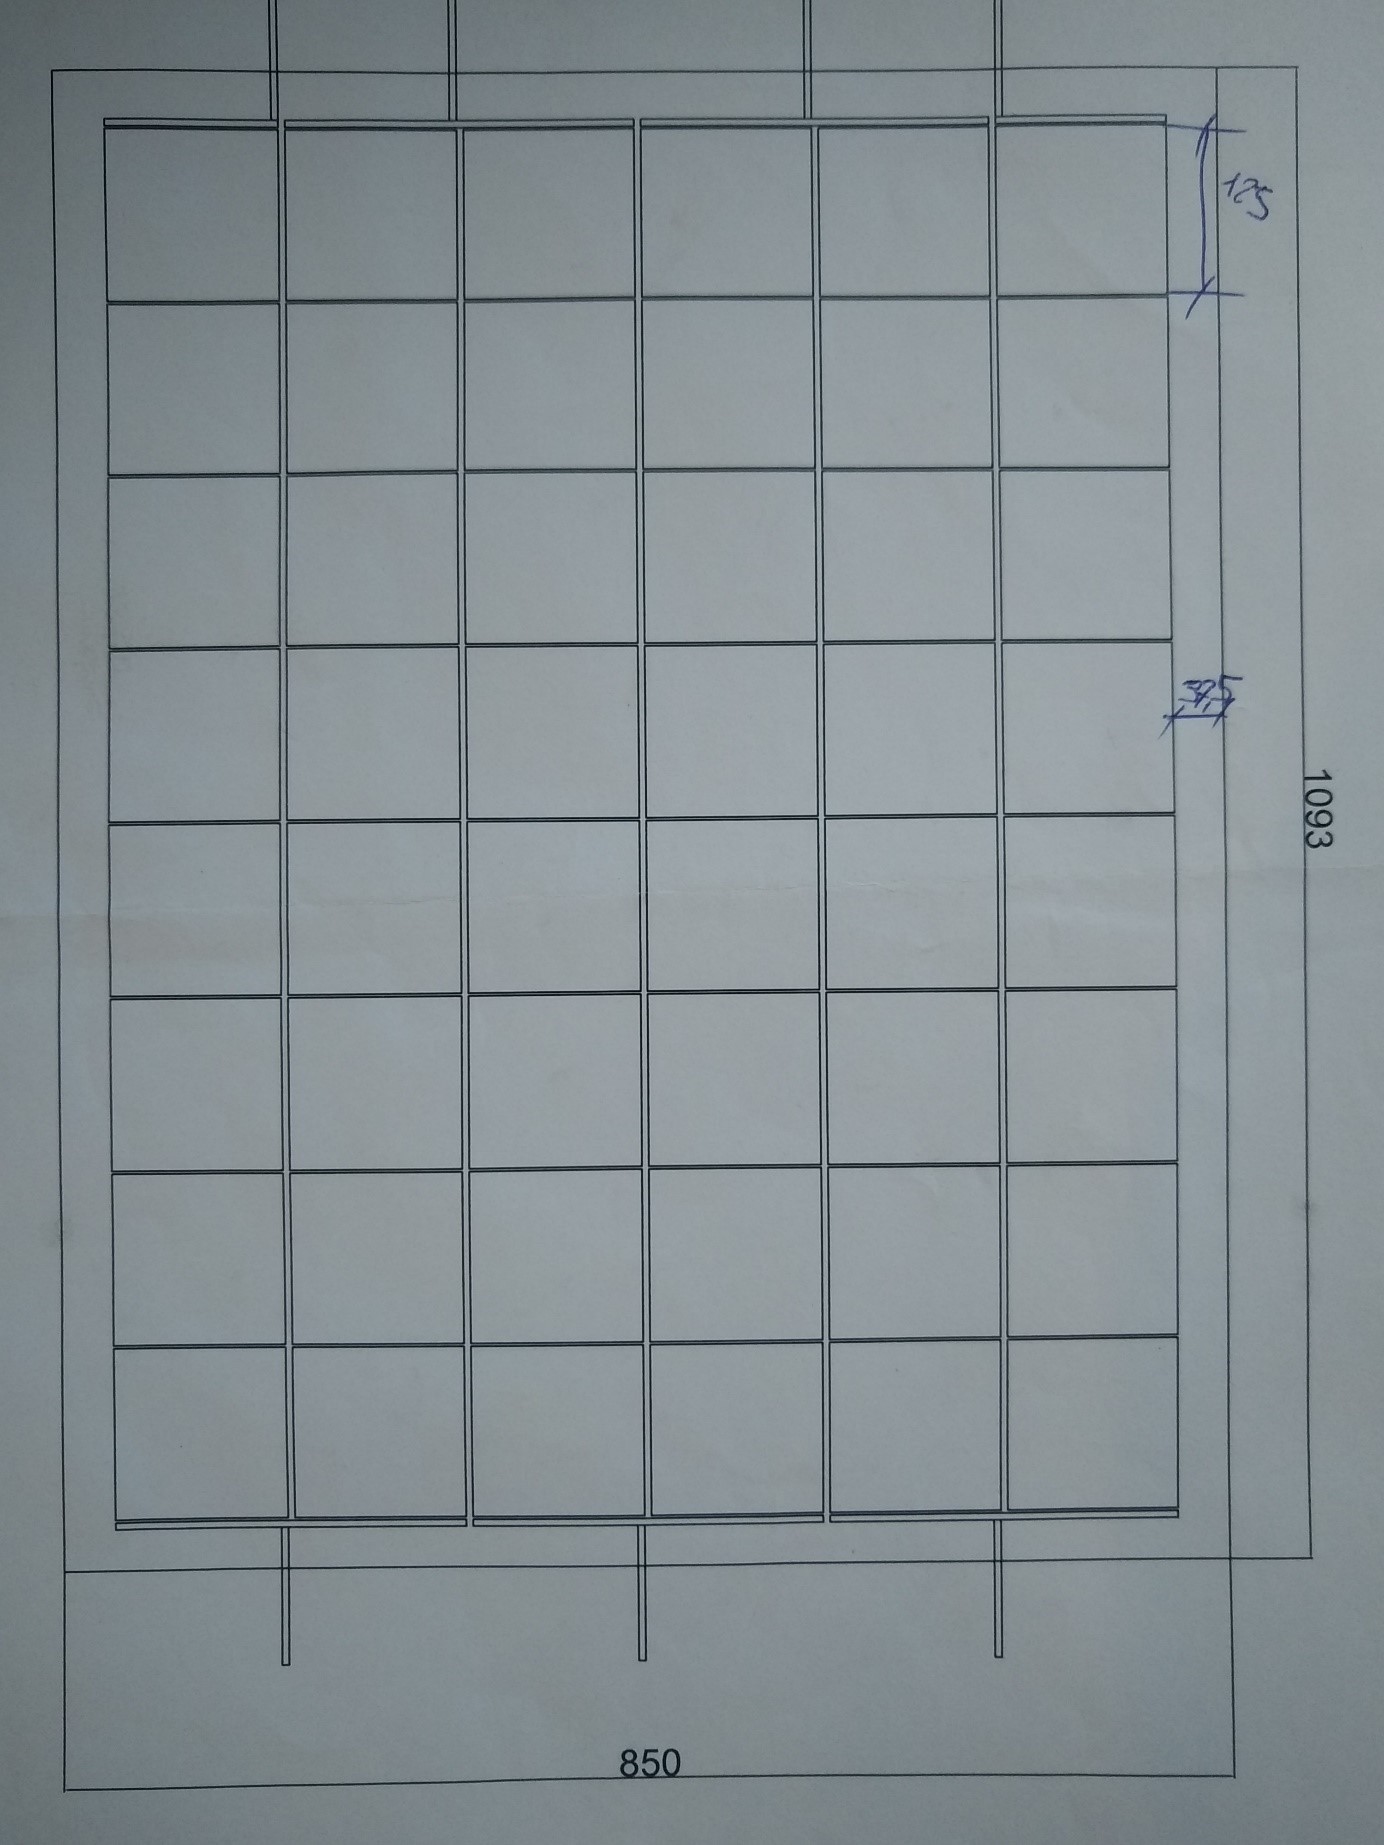
 The load-bearing structure of the solar panels is the critical point of this bike. It must be adapted to the existing bike, make a structure rigid enough to carry the 1.6m² of solar panels but flexible enough to absorb shocks and vibrations due to driving. Two characteristics finally quite contradictory.
The structure of the rear solar panel is the simplest. The wheel is "fixed", and you can start on a luggage rack: there is therefore little structure to add. I bought the arch of the aluminum "Tailfin" (https://www.tailfin.cc) luggage rack, which was attached to the rest of the bike with aluminum square tube (20x20x5mm). This square tube is the main support for the rear solar panel. The luggage rack also allows you to fix bivouac equipment (tent/down/mattress).
Remains the most delicate, the structure of the front solar panel with the great problem of the front wheel "mobile", attached to the handlebars (to turn!).
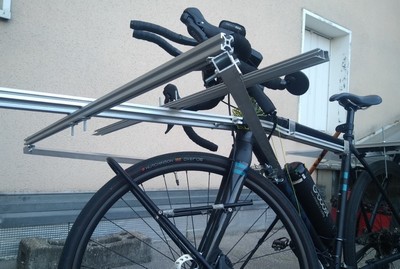
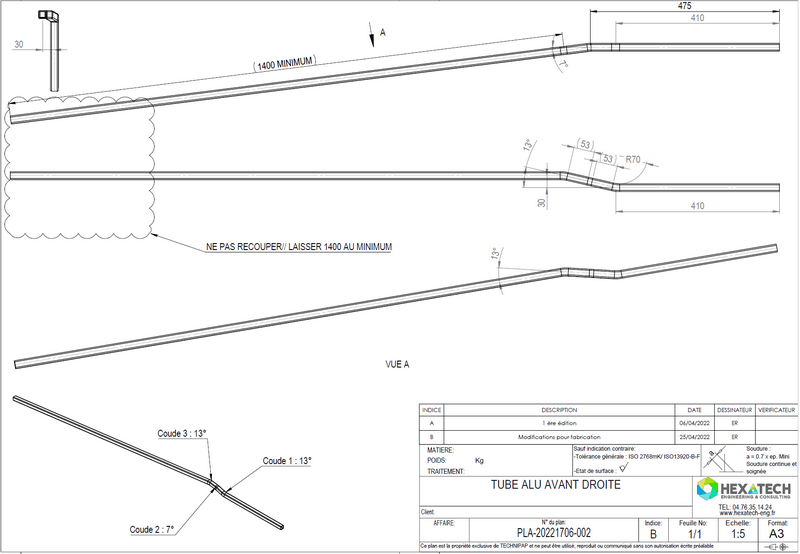
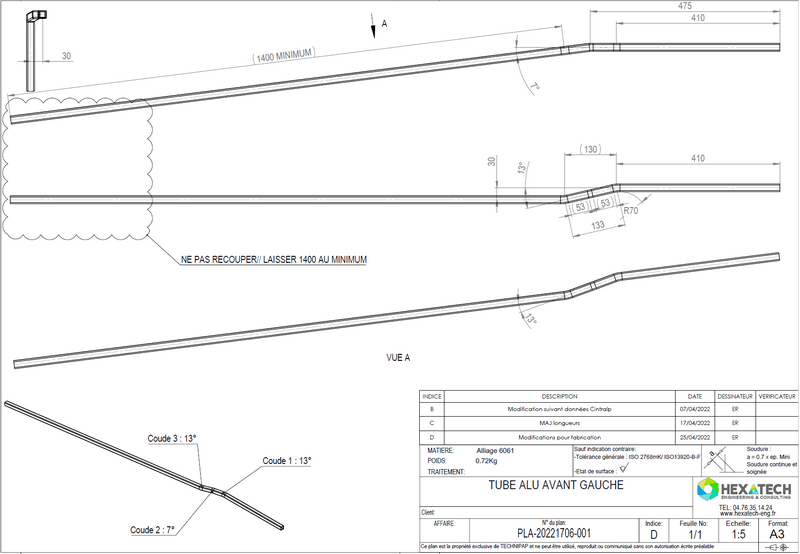
The idea being to have two panels of the same size at the front and rear, I wanted to free myself from the whole "front wheel – handlebars" system by imagining a structure attached to the frame. To maximize the rigidity of this structure, I used two large Bosch 20x20mm profile spars. These profiles were bent by a specialized company (Cintralp – http://www.cintralp-roulage-cintrage.fr/ and made to measure (manufacturing plans attached). A small test of about ten kilometers with these only two large profiles turned out… totally dangerous and unusable while driving. So I added a crosspiece, still in Bosch 20x20mm profile, allowing you to take over the down tube with two square profiles 20x20x5mm. The use of silentblocs (out of screw rubbers) completed this assembly to achieve a stable structure that absorbs vibrations.
The interest of Bosch profile bars is not only their rigidity, but the possibility of adjusting the various elements that cling to them, through the central grooves. In my opinion, it is also essential to use silentblocs (or anti-vibration studs for the French) to allow the structure to move without breaking, to absorb the vibrations of the road, in short, to make reliable a structure that is intended to be abused!
A luggage rack is present at the front on the fork, and allows to fix two bags of 12.5L. This has a double purpose: to carry all the equipment necessary for the trip (clothes, stove, food, etc.) but also to stabilize the steering, which tends to guise. Once the fork is "weighted" of these two panniers, the steering is greatly reduced.
Another element, not negligible: the crutch! With such an imposing bike, a classic kickstand is inoperative. For my part, I oriented my choice on a hiking stick, adjustable in height. Thanks to a "Tailfin" (https://www.tailfin.cc) clamp I could easily attach this crutch to my seat tube. The interest of adjusting the height of the stick makes sense at breakfast, in the morning, when you have to tilt your solar panels towards the rising sun.
An extra kickstand would not have been too much: my bike was often unbalanced and fell once or twice, fortunately without gravity.
Above, left photo: the front structure seen from the front, without the solar module. Right photo: side view. Note the angle of attack of the front panel, to prevent the air from rushing too much from below.
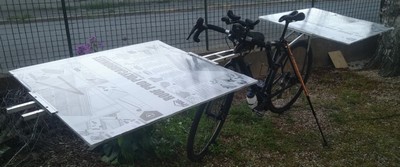 Figure 11: Assembly of the structure, and full-scale test with polycarbonate plates (while waiting for the solar modules…)
Battery
METAKIN – https://www.metakin.fr/
Aluminum box / Li-ion cells / Capacity: 750Wh / Rated voltage: 48v / MPPT and solar shunt cycle analyst included / Weight: ~5kg
The battery is custom-made. It seemed important to me to centralize all the electronics in one place, and to protect it from bad weather. The solution proposed by Metakin perfectly met my request: we obtain a compact system, ideally placed in the triangle of the frame, and rather light.
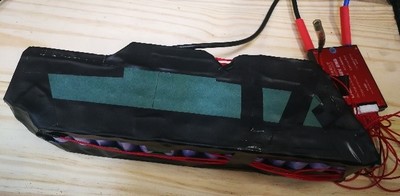 Photo opposite: battery pack protected by an insulating coating and BMS.
The box was custom-made, in 2mm mechanically welded aluminum. It can accommodate everyone (battery + BMS, two MPPT, solar shunt and all the cable!) sheltered from bad weather… 2 storms attest to this.
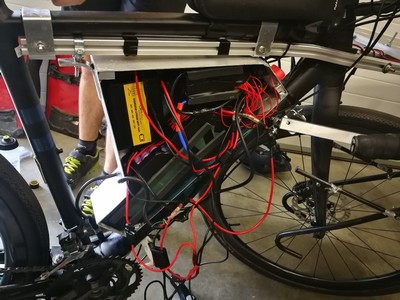 This box also evacuates the heat generated by electronics (MPPT, BMS, etc.). Indeed, the MPPT are pressed against the wall of the box, and screwed on it. A master switch turns off the entire system. There is also a connection to recharge the battery from the mains. The shape of the case makes it possible to keep the place of a gourd at the level of the triangle of the frame. The box attaches to the inserts of the down tube of the frame, and to the Bosch 20×20 profile of the front panel structure that runs along the horizontal tube.
If the installation seems complicated inside, it's finally rather simple! See the synopsis of my electrical installation below. 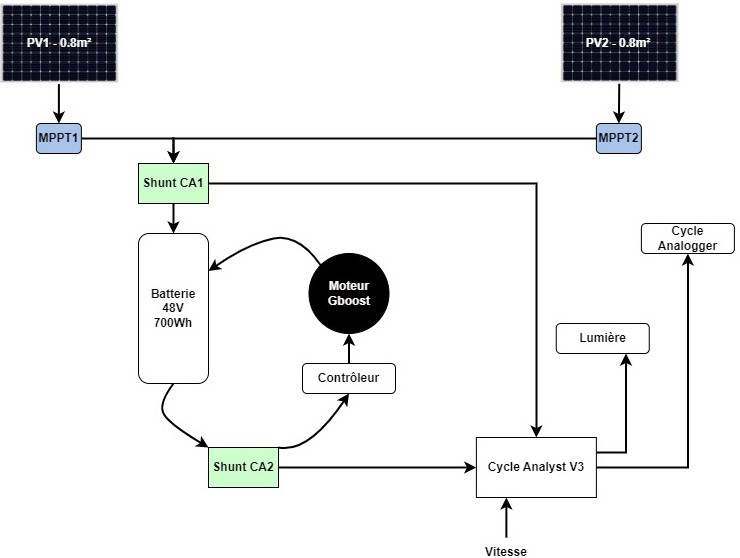 If I had to do it again, I would be inspired by the battery boxes on Danü and Sibylle's bikes. A 0.5mm steel sheet is sufficient, and their box is much easier to reassemble in case of roadside troubleshooting! We could also imagine a box that integrates only the electronics of MPPT, in order to save weight. You can easily lose 500g on an improved version of the battery box!
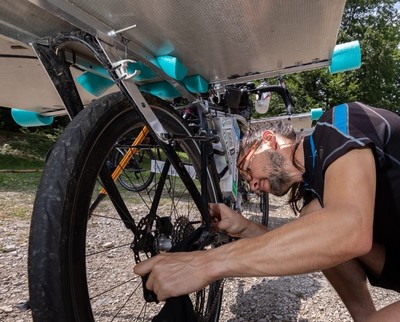
Engine
GBOOST – https://www.gboost.bike
Weight: 1.1kg / Power: 500W (nominal) – 800W (peak) / Torque: 50Nm
At first glance, the GBoost roller motor does not look good. It is very small, very light, it rubs on the rear tire of the bike like a "solex". At the start of the Sun Trip Alpes 2022, no one would have bet on him! But, once installed, once tested, we realize the rare pearl that is this engine! 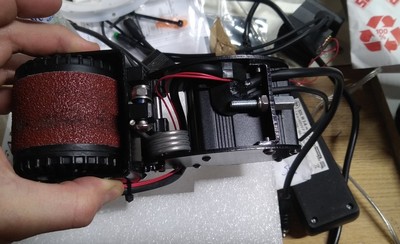
Photo opposite: The GBoost engine and its controller. Mini weight, maxi assistance.
By its lightness, this motor was the ideal option for me who wanted to minimize the total weight of the solar vehicle as much as possible. It is also extremely powerful and efficient, especially uphill, where it develops all its abilities. Indeed, the roller (about 6cm in diameter) that drives the wheel (70cm in diameter) acts as a multiplier in the chain of transmission of forces.Indeed, for one turn of the wheel, the GBoost roller will have turned a little more than 10 turns. It can therefore deliver its maximum torque of 50Nm over time, even in a steep climb (> 10%). The ideal engine for a mountainous journey! On the other hand, on long flat stages, it proved to be less efficient, because to hold the speed on the flat (about 35-40km / h), the roller had to turn very quickly, and it therefore consumed a lot of energy (much more than in the climbs).
The controller is also made by GBoost, and it is clearly doing well! The selection of assistance modes is very basic (5 modes), but the controller automatically regulates the power delivered by the engine, according to the internal temperature of the engine. So I happened to warm up the engine, often at the end of the day, in a last big pass. The controller then sent only half of the power to the engine, so that it would go down in temperature: the calves had to compensate for this lack of power, and then I got tired very quickly! But at least the engine was safe. This is an essential safety, because we do not worry about the engine heater, and the risks of burning the engine are really reduced.
GBoost has yet another advantage (yes, yes!): it can do regeneration! As the roller starts to rotate when it is supplied with energy, it can physically provide energy if it turns! The development of regeneration is not the most abbotious, because this regeneration is "natural", not electronically controlled. It is therefore necessary to take the bike (and therefore the roller) at a sufficiently high speed to provide a potential greater than what remains in the battery. In practice, I observed an instantaneous recharge of about 150W at… 50km/h. Suffice to say that I did not regenerate often: it was necessary a perfect asphalt, without too many bends, in short, a road almost impossible to find!
Last positive point of this engine: it is disengageable. At any time, a handlebar control allows you to pull on the roller, which is then no longer in contact with the tire. The bike then behaves like a classic bike! This can be very useful when you really want to save as much battery energy as possible. In rainy weather, I have pedaled (slowly but surely) without a motor, on downhill false flat sections. The disengagement of the roller can also be useful during a failure or engine breakage, so as not to be blocked and to be able to drive with the strength of the legs to the next city to troubleshoot. Fortunately, this is a scenario that I did not have to experience!
Solar cells
[INES – https://www.ines-solaire.org/]
Weight: 2.685kg per module / TOTAL ~ 5.4kg
Power: Module 1 flashed at 169.158Wp / Module 2 flashed at 163.902Wp / TOTAL ~ 330Wp
Essential element of a solar bike, the photovoltaic panels that I had the chance to use came straight out of the INES: National Institute of Solar Energy. The idea remains the same as for the other elements: lightness and reliability!
It was decided to build two identical modules of 0.8m², to simplify their manufacture and also their use: if one of the two panels were to be heavily damaged (fall, failure), it is then very easy to stack the two panels on the back of the bike and continue the journey!
The cells that make up the two modules are SunPower solar cells, a classic used by many solar bike travelers whose relevance is well established. These cells have a high efficiency (about 23%); their connectors are on the back side (the famous "back contact"), which makes it possible to receive the sun on the entire surface of the cell; They are very reliable because they accept small deformations and tolerate vibrations well.
The novelty lies in the assembly of the photovoltaic panels themselves.
The cells are fixed on a honeycomb aluminum plate, which is very light and very rigid. This plate is self-supporting: no need for a heavy and bulky frame to fix the photovoltaic panel! We get a power/weight ratio of 60Wc/kg, which is very good! This aluminum plate also makes it possible to regulate the temperature of the module: during taxiing, the induced wind cools the aluminum which is a good thermal conductor, and also cools the SunPower cells. The cooler a cell remains, the better its performance. This is a point that should not be overlooked. The upper surface of the cells is protected by several very thin layers of protection.
 Another novelty in the architecture of these modules: small metal "legs" come out at the front and back. This makes it possible to overcome a material breakage: if a corner of the panel is inoperative (after a shock for example), it is enough to shunt a whole line of cells, connecting to the "metal tab connected to the lines of cells still healthy. An easily achievable adaptation to the side of the road!
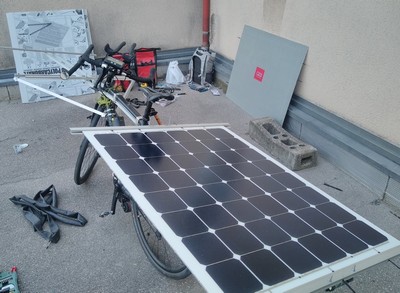
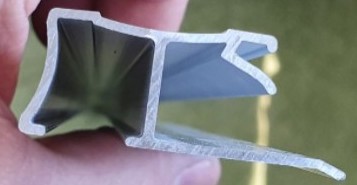
The modules are mounted on the front and rear structure of the bike. They are sandwiched by two specific aluminium profiles.
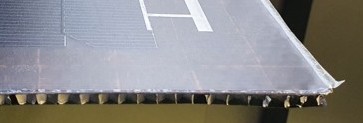
Magnificent portions of blue foam fries protect this entire device from shocks.
Tips and remarks
In bulk, some tips and various remarks.
– I wanted to install extension bars at the start, to gain aerodynamics on the flat stages. In the end, this proved unusable, because the structure of the front photovoltaic panel resulted in a light but formidable guidonnage, sufficient to have to hold the handlebars at its ends.
– Water cans: having no more room in the triangle of the frame, I placed two 750mL cans directly on the handlebars. These canisters have a flexible, angled pipette. Very practical, easily accessible, in short a great alternative!
– Tool can: it is very important to have a minimum of tools and repair equipment on you on a trip in autonomy. I had housed most of this material in a 500mL can, placed under the bottom bracket. It contributes to the lowering of the center of gravity, it does not bother, and it does not take unnecessary space elsewhere!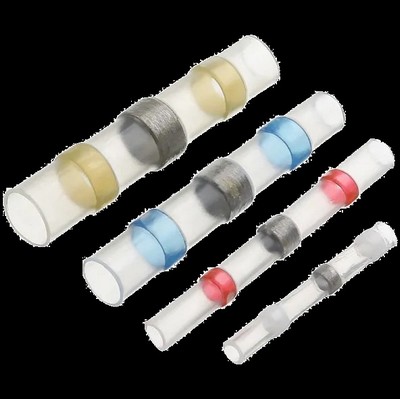
– The "soldering sleeve" is the perfect ally of the solar bike traveler. It is a kind of heat-shrinkable sheath, integrating at both ends a sealing material, and a tin ring in the middle. It is very easy to repair an electrical connection by using a simple lighter on the side of the road!
Finally, I would like to address the issue of the budget. For the realization of this solar machine (which remains my everyday bike when you remove all the "solar" part), it takes a little more than 6 000 €, distributed as follows: Bike ~ 3500 €, Motor ~ 800 €, Battery ~ 900 €, Structure and accessories ~ 800 €. Photovoltaic panels are absent from this budget, because they were lent to me by INES.
Putting things into perspective
By analyzing the navigation data, I was able to estimate the electrical energy consumption of my solar machine around 8Wh/km. In total, I rode more than 5000km and swallowed some 90,000m of altitude difference during the Sun Trip Alpes 2022 and during the preparation sessions. Over the entire route, the data returns an average speed of 25km/h. Overall, it is therefore 40kWh of electrical energy produced by the photovoltaic panels and consumed by the engine, the equivalent of… of 4 liters of diesel! If I dare to make the comparison, we can say that I consumed 0.08L/100km. A glass of wine filled with gasoline, every 100km!
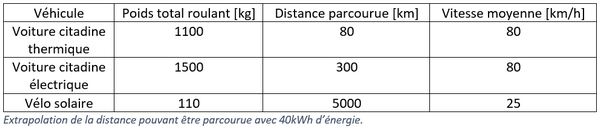
The only question to ask is: For the same amount of energy, do you prefer to drive at 25 km/h for 6 months with a 40kg solar machine or drive at 80km/h for an hour with a one-ton car?
It's up to you!
Annexes